Ambitions
How It All Started
From the age of 16, I was self-employed and always believed that investing 100% of my effort into my own project would reap better results than anything else. This was my vision from my adolescence. I embarked on this mission after successfully launching my own company, BPC Midlands, and finishing my degree in Construction Management and Property Development; this was my company’s first solo project. I found out that there was a lot to be learnt whilst undertaking this development; more than I could have anticipated at its inception. I took inspiration from off-site construction projects as this is an ever-developing area of the industry. The idea for the unit was to make a room that could be utilised for various purposes such as a workshop, office space, man cave, annexe, or even just an additional living space. The design and planning of this project was for it to be an all-purpose unit that would be a great addition to the customer’s property. On this page, I have documented the progress and the precautions I took during this development.

Stage One: Research and Purchasing
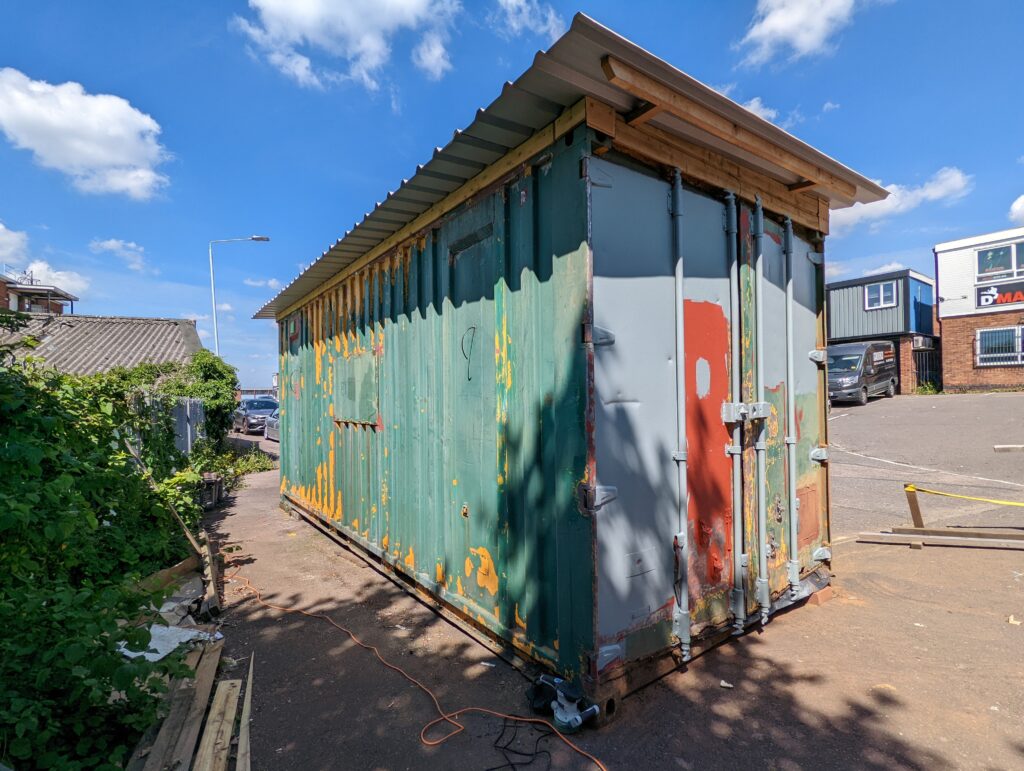
Initial Condition
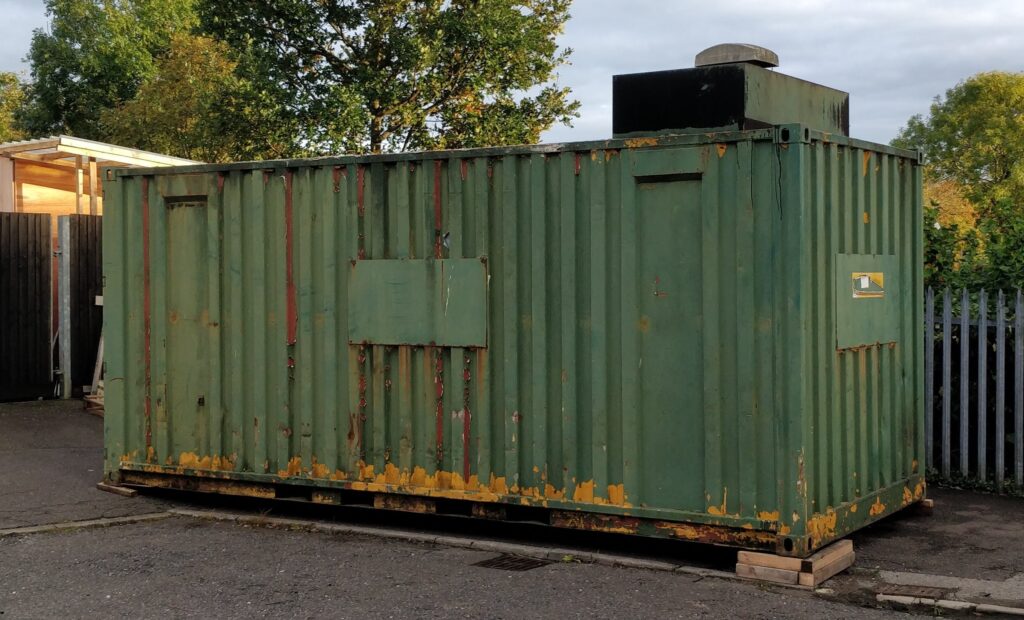
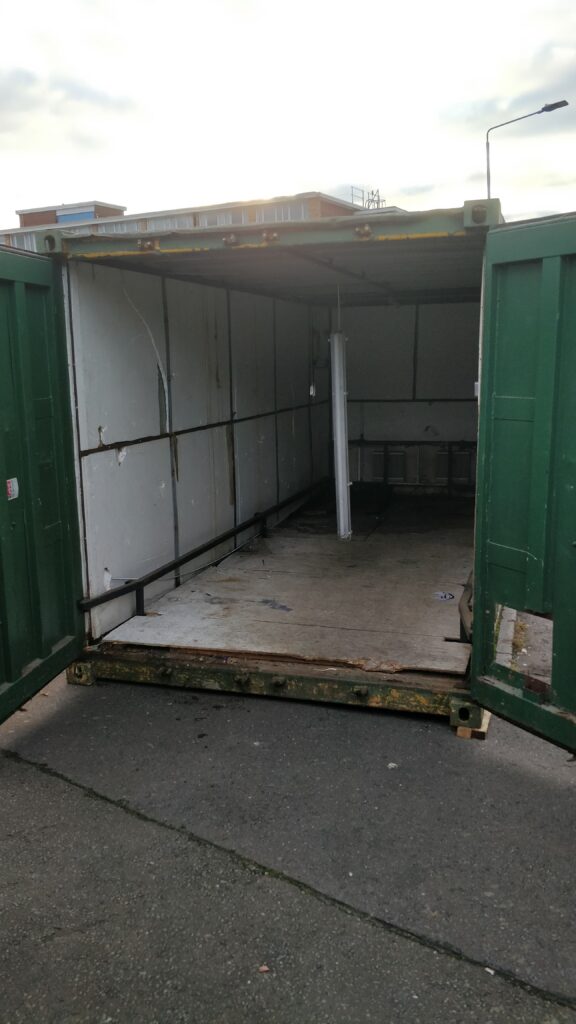
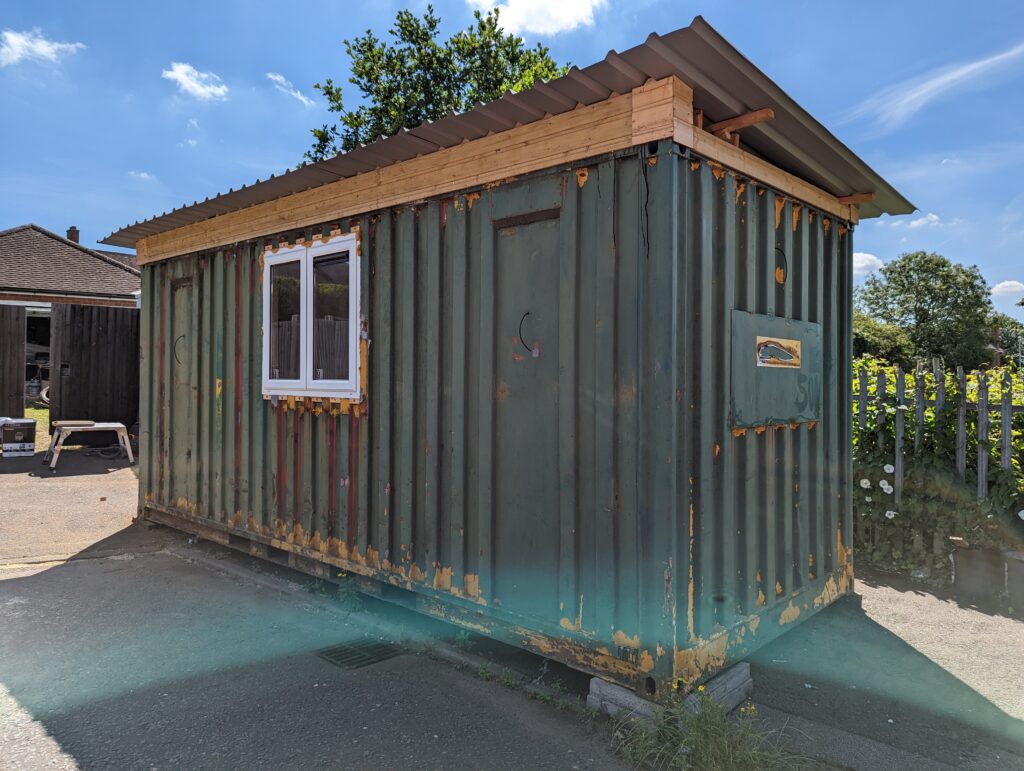
Throughout my time as an electrician and as a project manager, I found that I have always had a knack for scouring the internet for bargains and the purchase of this container was just as exciting as the rest. Having viewed around five units in my local area, I decided to purchase an ex-refrigeration container from Peterborough. The unit’s base colour was yellow and had been painted royal green by the previous owner. The condition of the exterior was generally okay, with the only area with cause for concern being the large steel box on top of the container’s roof. This box originally housed the refrigerating units, but unfortunately was causing a sag in the roof due to its extreme weight of approximately 200kg. Additionally, there were various dents and damages that were brought to my attention. On further inspection of the interior, I found box section steel protecting the lower levels of the container walls; this was used to protect forklifts from piercing or damaging its walls in addition to two heaters at the rear of the unit. The interior also featured thin insulation in the form of polystyrene and a damaged plywood floor.
Design Ideas
I began planning and designing the container by sketching ideas, which included:
- Doors and Windows:
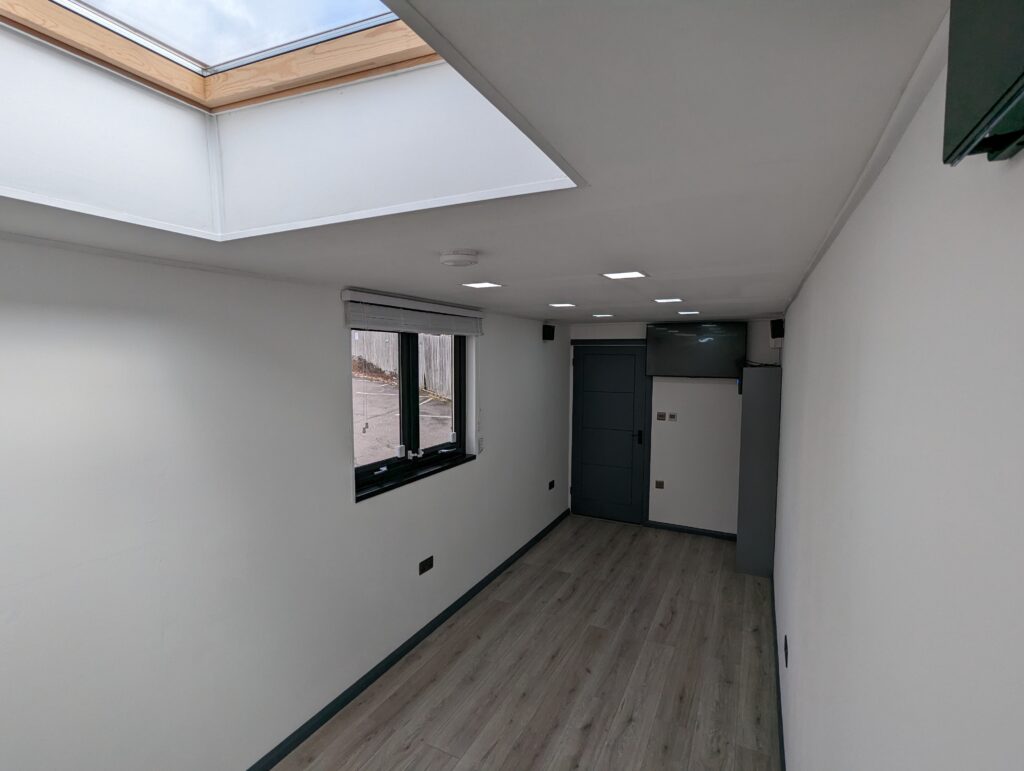
- Skylight window
- Large window to allow for maximum natural lighting
- Blinds
- Conventional internal door
- Walls:
- Insulate and plywood walls
- Paint finish
- Architrave and trim
- Roof:
- Shed roof to prevent water from sitting on the current flat roof and add life
- Roof fascia
- End roof sheets were designed to be easily lifted for transportation purposes
- External Paint and Protection:
- External body of the container needs filling of any deep dents
- Rust protection
- Protective primer and industrial-level paint
- Electrical:
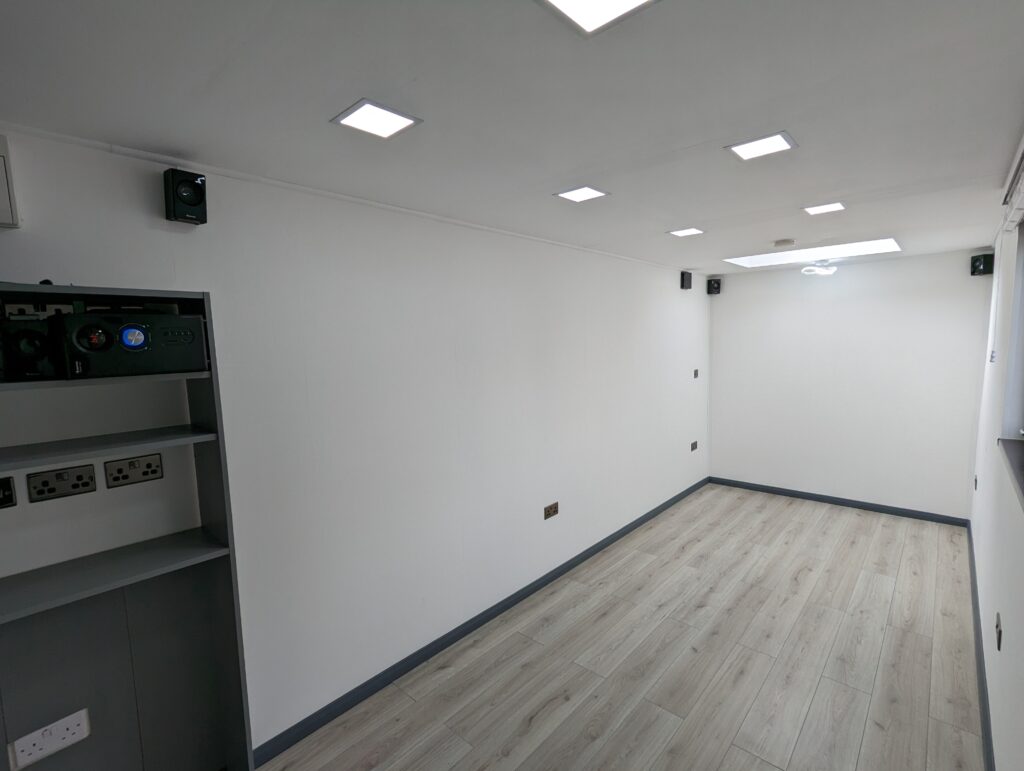
- Complete electrical installation
- Effective interior panel lighting throughout the space
- Adequate power outlets (this included 10 sockets evenly spaced)
- Larder unit which has shelves for small appliances and a small refrigerator
- Power to surround sound speakers
- Underfloor heating to the mid-section of the floor with a touch screen thermostat
- Extractor fan
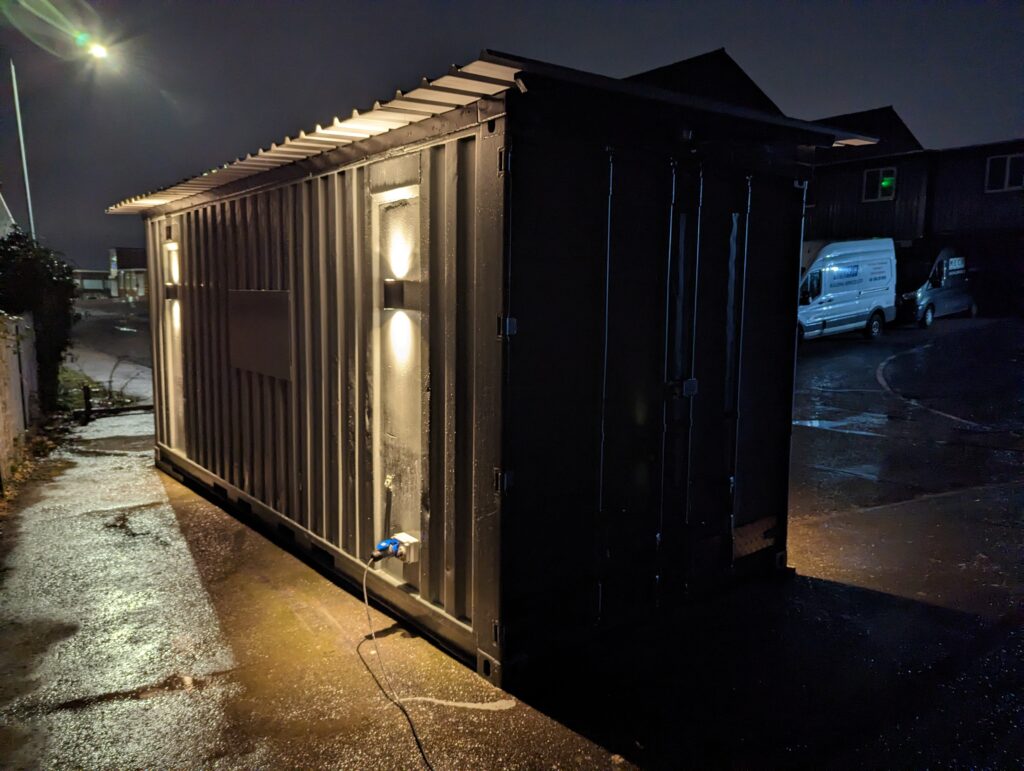
- External lighting: up-down lights and a security floodlight
- 18th Edition consumer unit connected to a commando plug hook-up

Stage Two: Exterior Construction
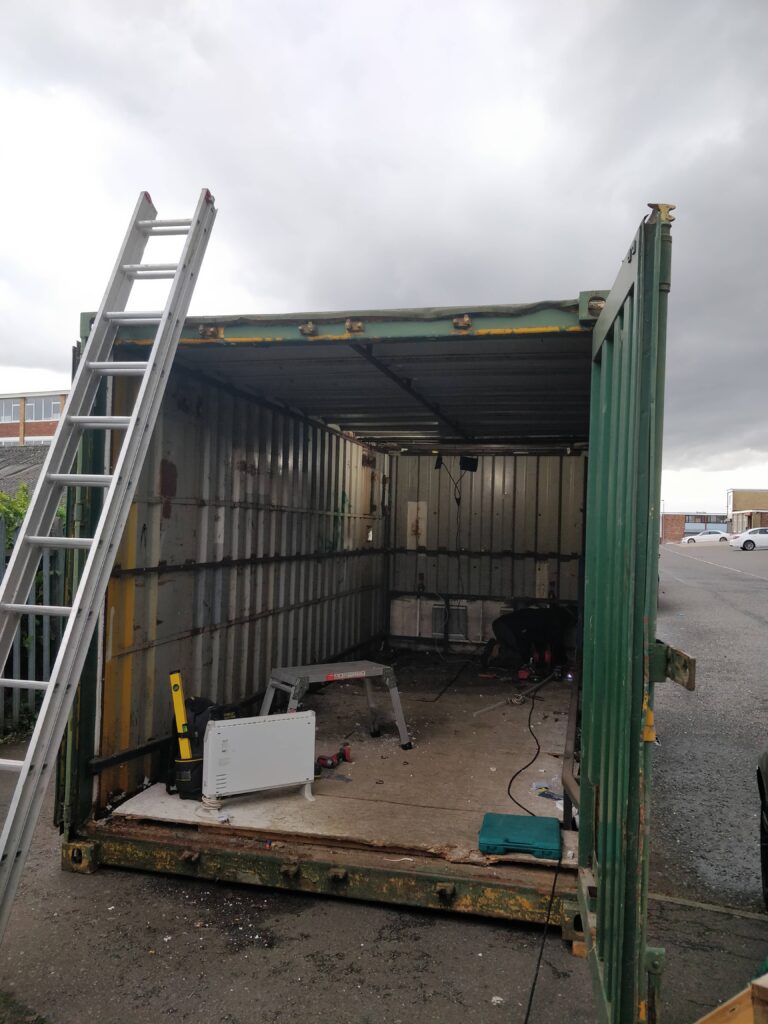
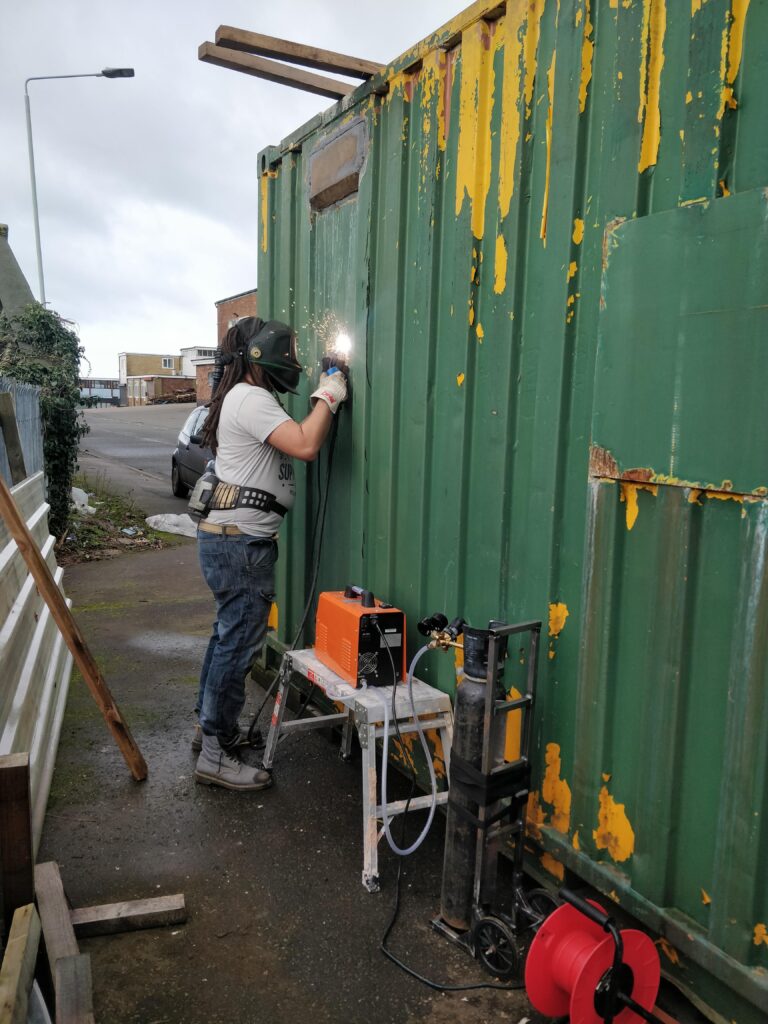
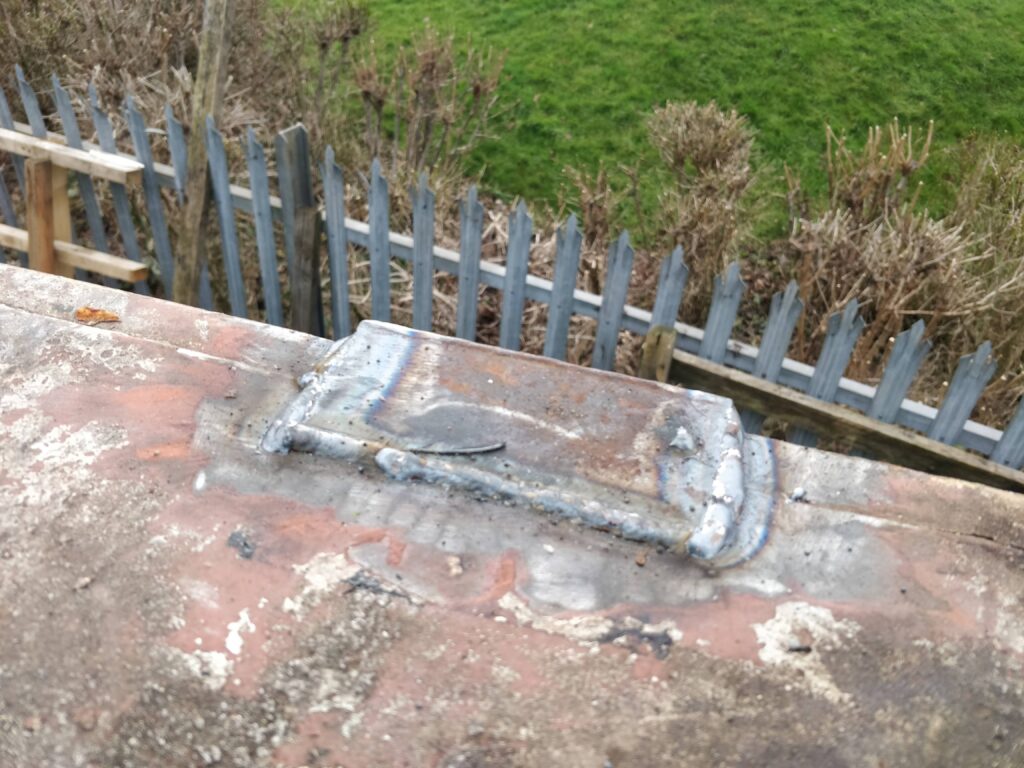
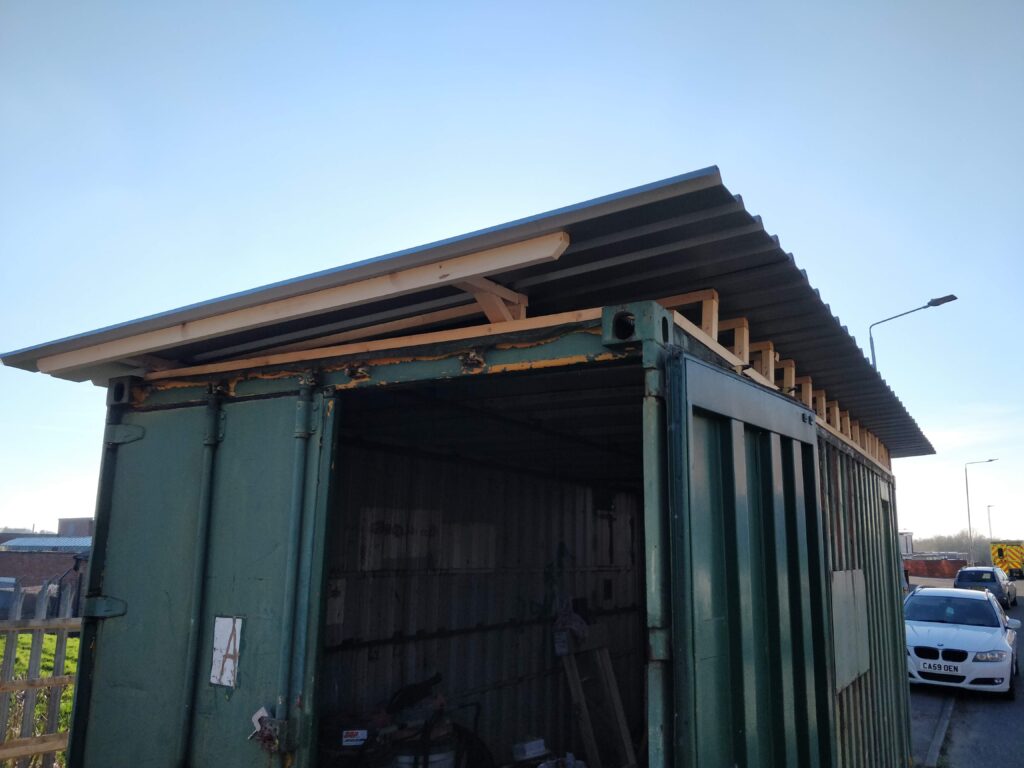
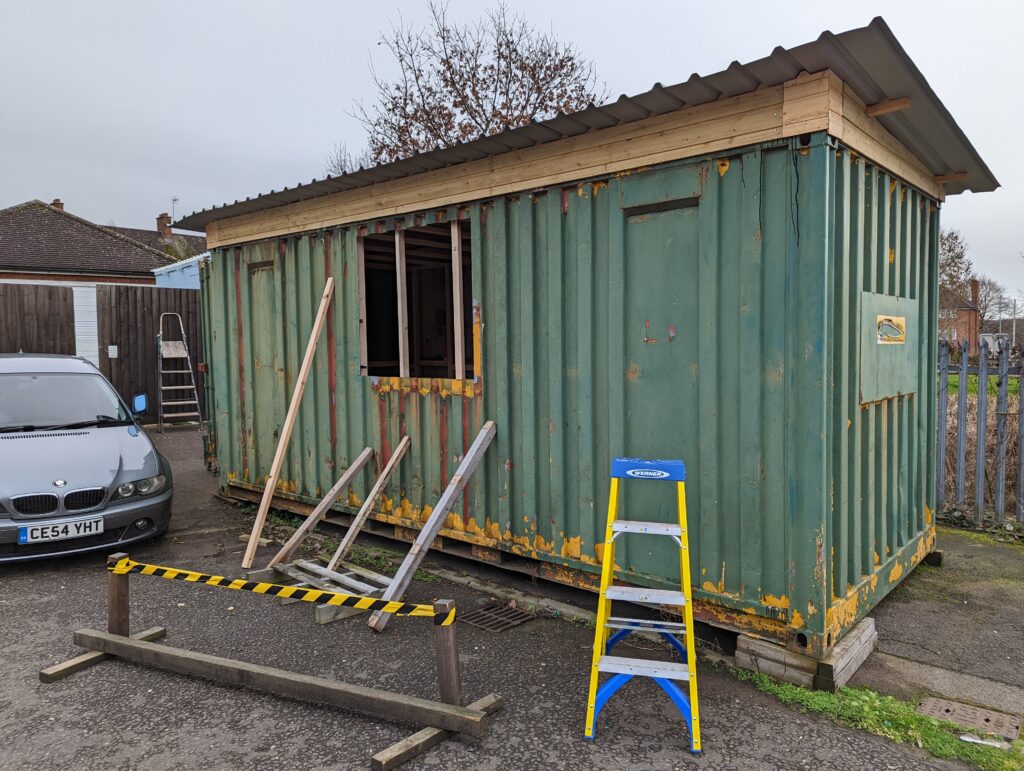
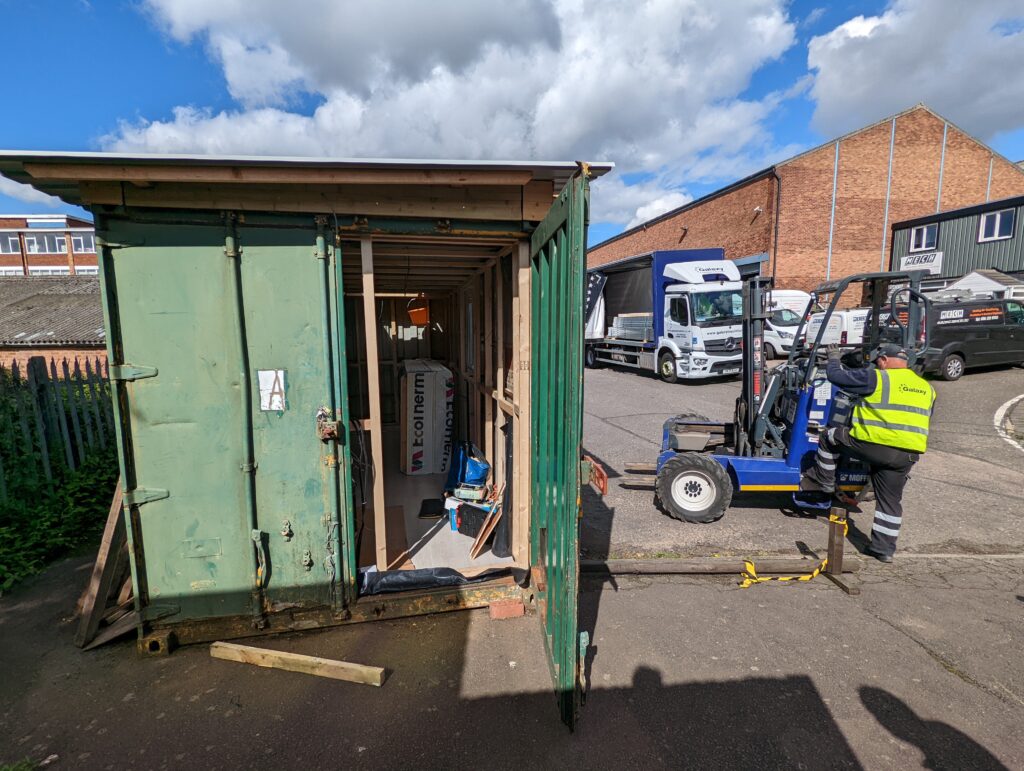
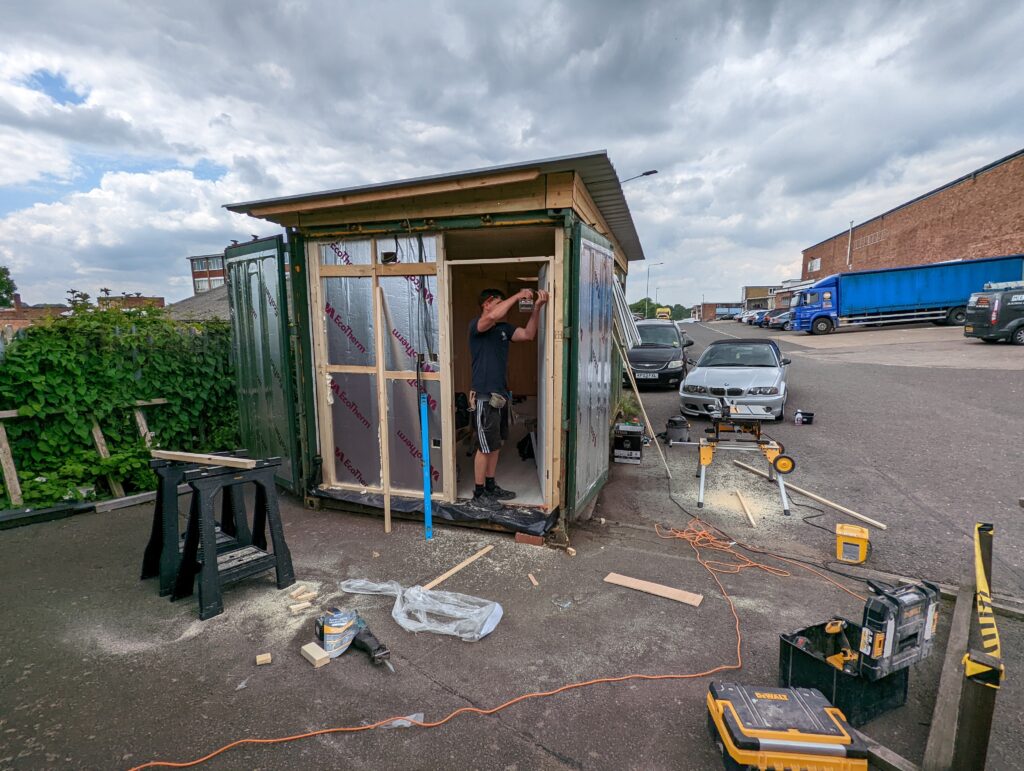
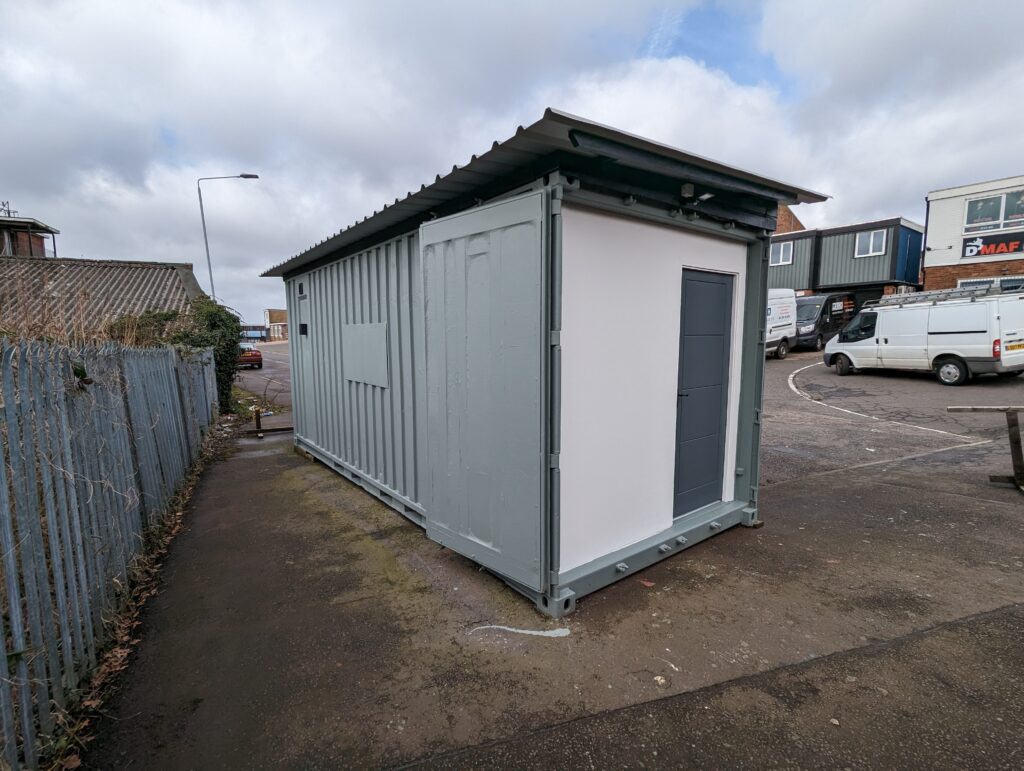
The initial steps were to prepare and clear the area of any vegetation and debris ready for the delivery of the container. Upon delivery, the first steps I carried out included gutting out the interior metals and insulation of the unit. Shortly after I gutted the interior, I cut off and removed the metal box from the roof. I assessed the damages caused by this heavy metal box; it was quickly brought to my attention that most of the water sitting on the flat roof would come down to this fresh cut-out section. Having safely disposed of the unwanted materials, I then set out to make the container water-tight. This required cutting out sections of steel to fill any holes and box sections to be gas-welded in order for it to be water-tight. After the container was made water-tight (excluding the new skylight window location), I dried it out over the course of a week with heaters to ensure the unit was prepared and ready for the next stages.
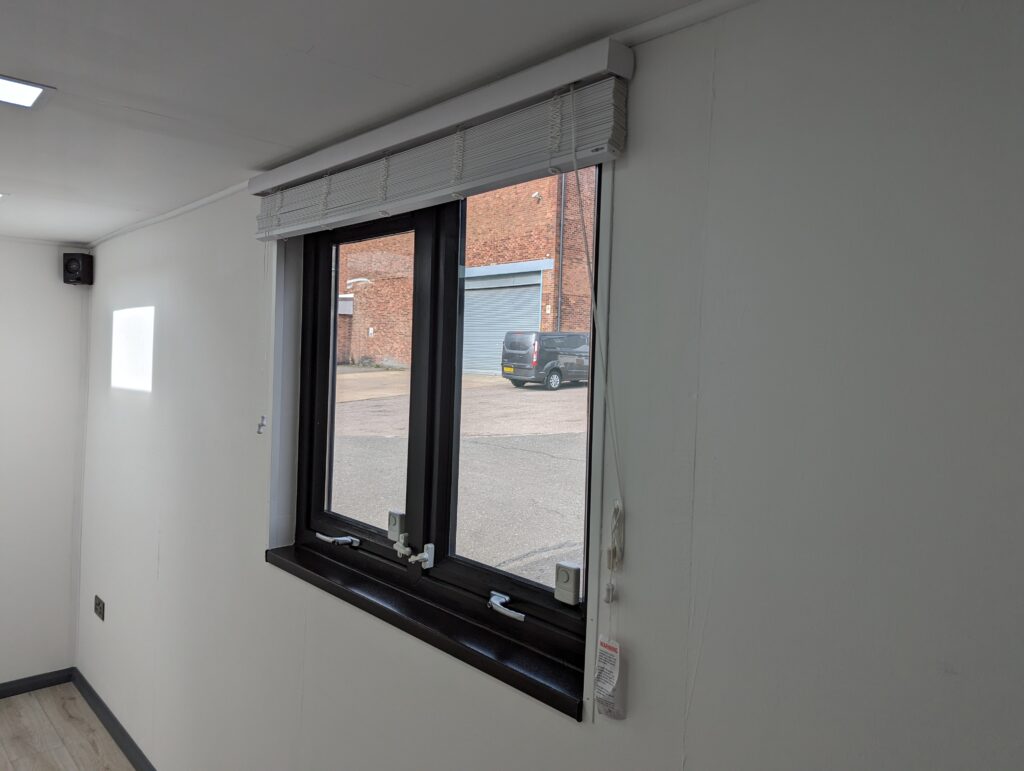
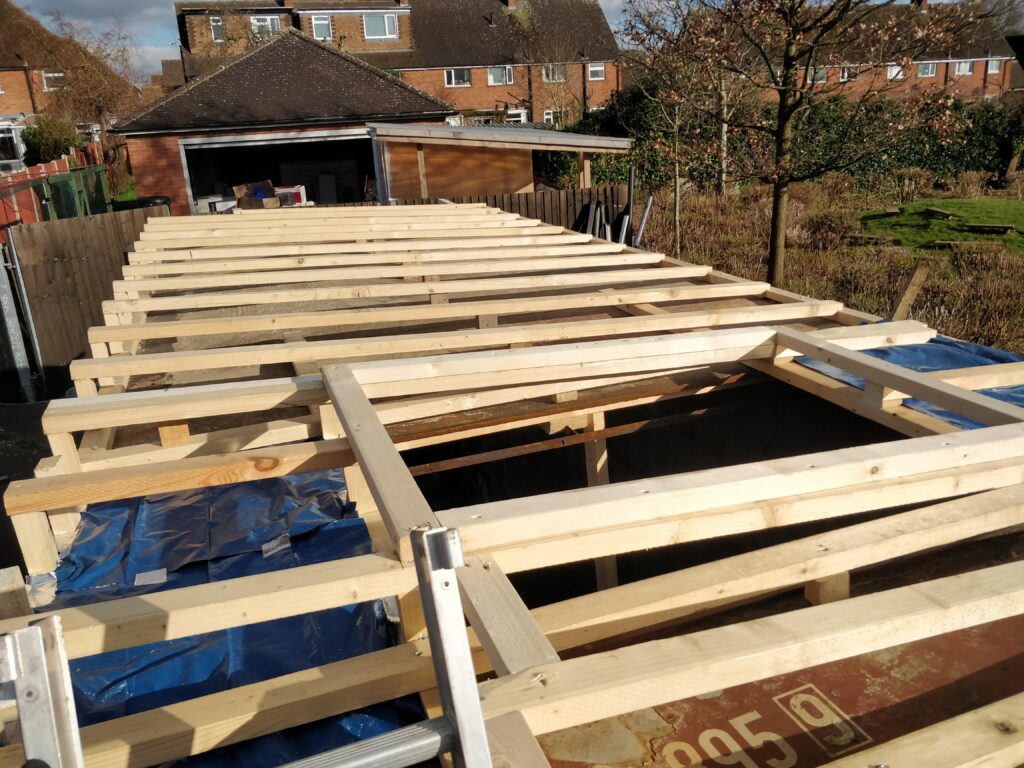
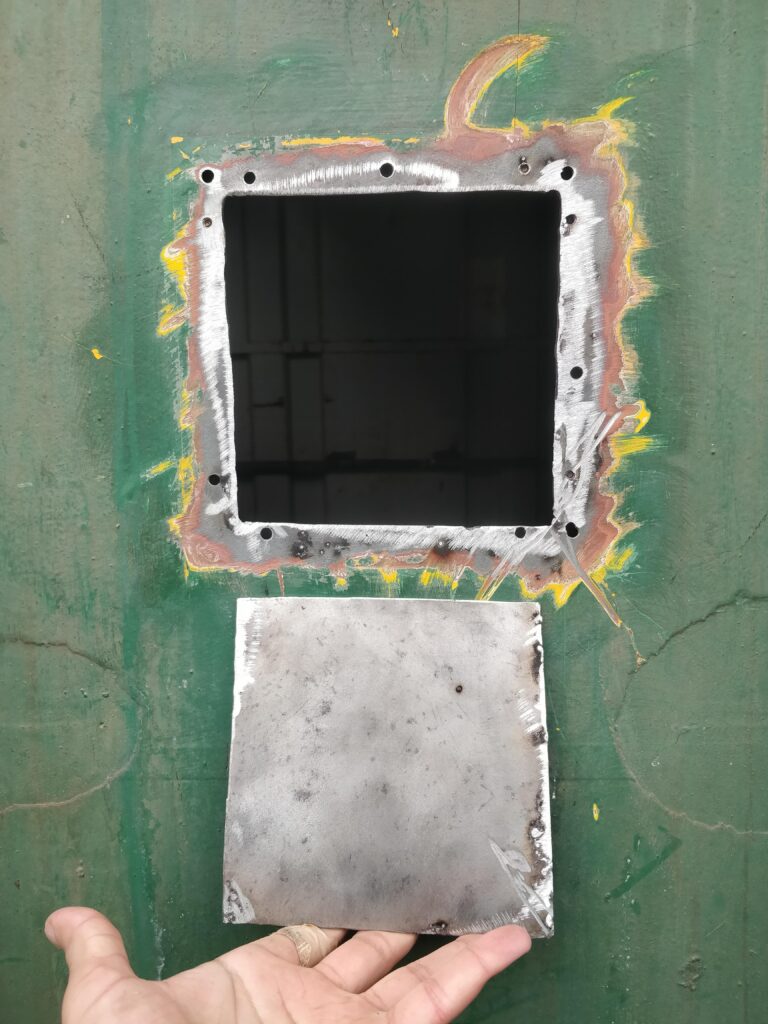
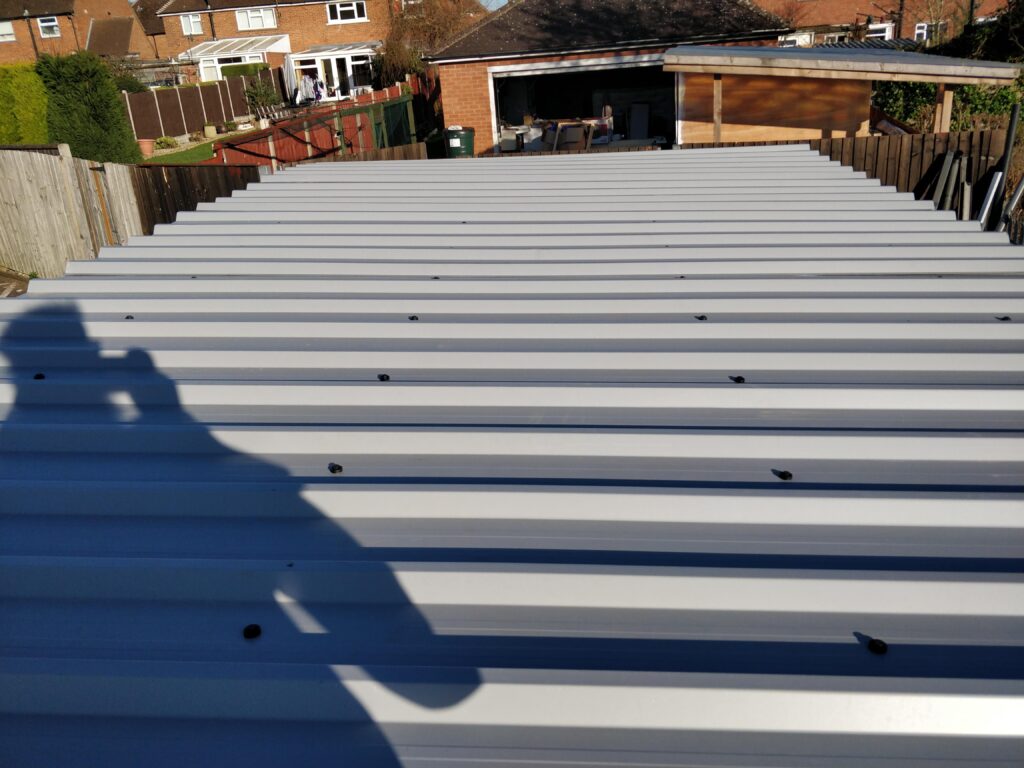
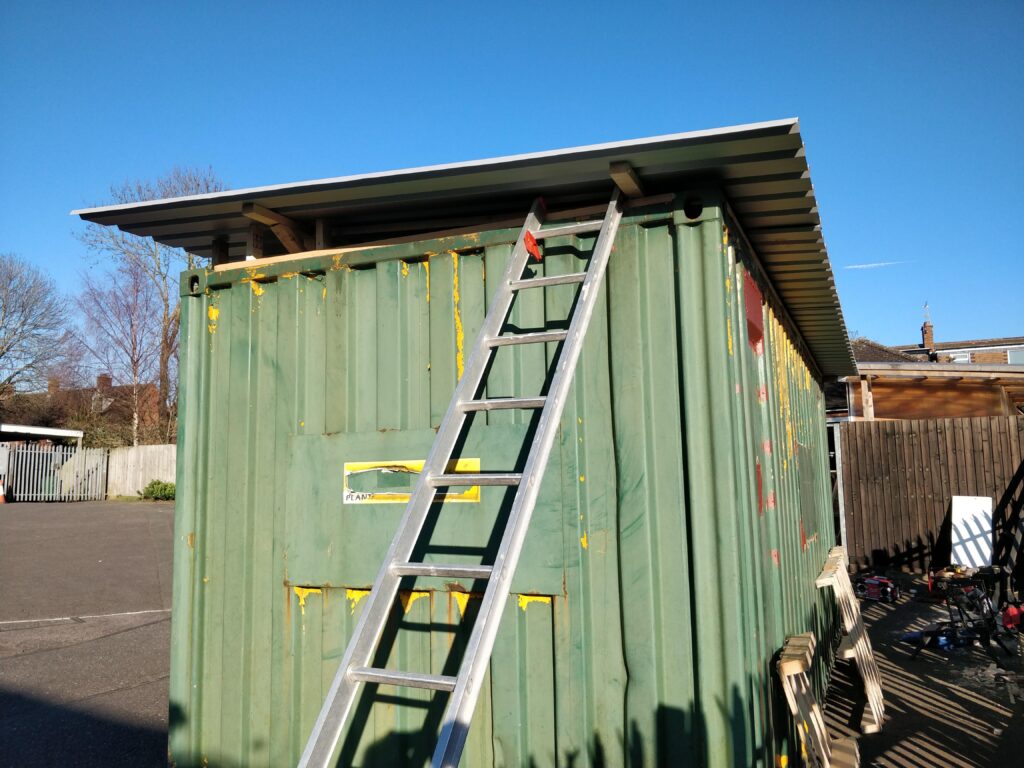
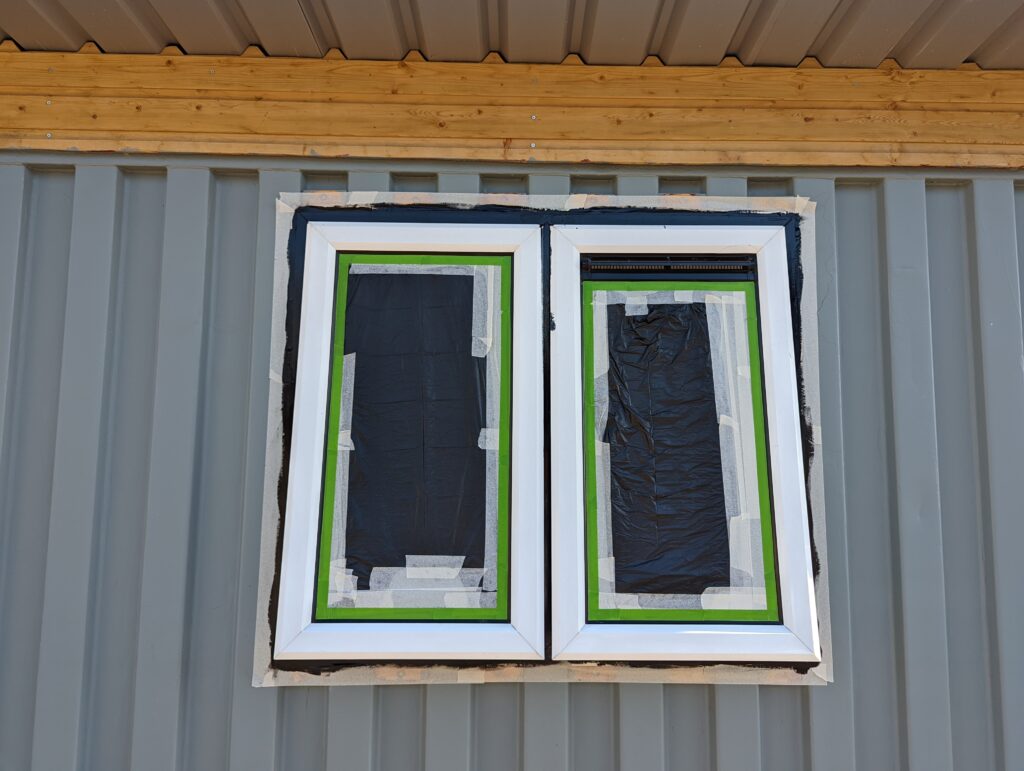
I did a fall test on the roof to see what the maximum pitch could be which enabled the water to still run off. This was because the roof couldn’t be pitched too high as it would not be able to be lifted for transportation. Having confirmed the appropriate pitch, I started on the roof structure. On both ends of the roof, I allowed for an overhang, it was essential to have this, particularly at the front of the container, to keep rainfall off of the doors. I ensured that an overhang was present on all of the perimeters to prevent rainfall from hitting almost all of the unit’s sides. Due to the large metal box that was removed, I realised that, unfortunately, this would have to be the location for the new skylight window. This was the most cost-effective and efficient practice for installing the skylight window as it would be very expensive to cover the hole where the metal box was and additionally cut a new hole for an ideal window location. Having completed this roof structure and frame; it was time to position and install the box profile roofing sheets. This was carried out and secured in place ready for the skylight window to be installed. I chose a 0.78×1.18m skylight window which was the largest that could be installed into the hole from the metal box removal. This was installed and the flashing was not 100% effective on the first installation, so I had to make adjustments to strengthen it to ensure that it was water-tight. After the skylight was fitted, the unit was water-tight. The roof was completed at this point. At a later point I installed the roof facias using wooden shiplap material. The exterior just needed painting which I planned to do when all of the internal construction was finished.
Stage Three: Internal Construction
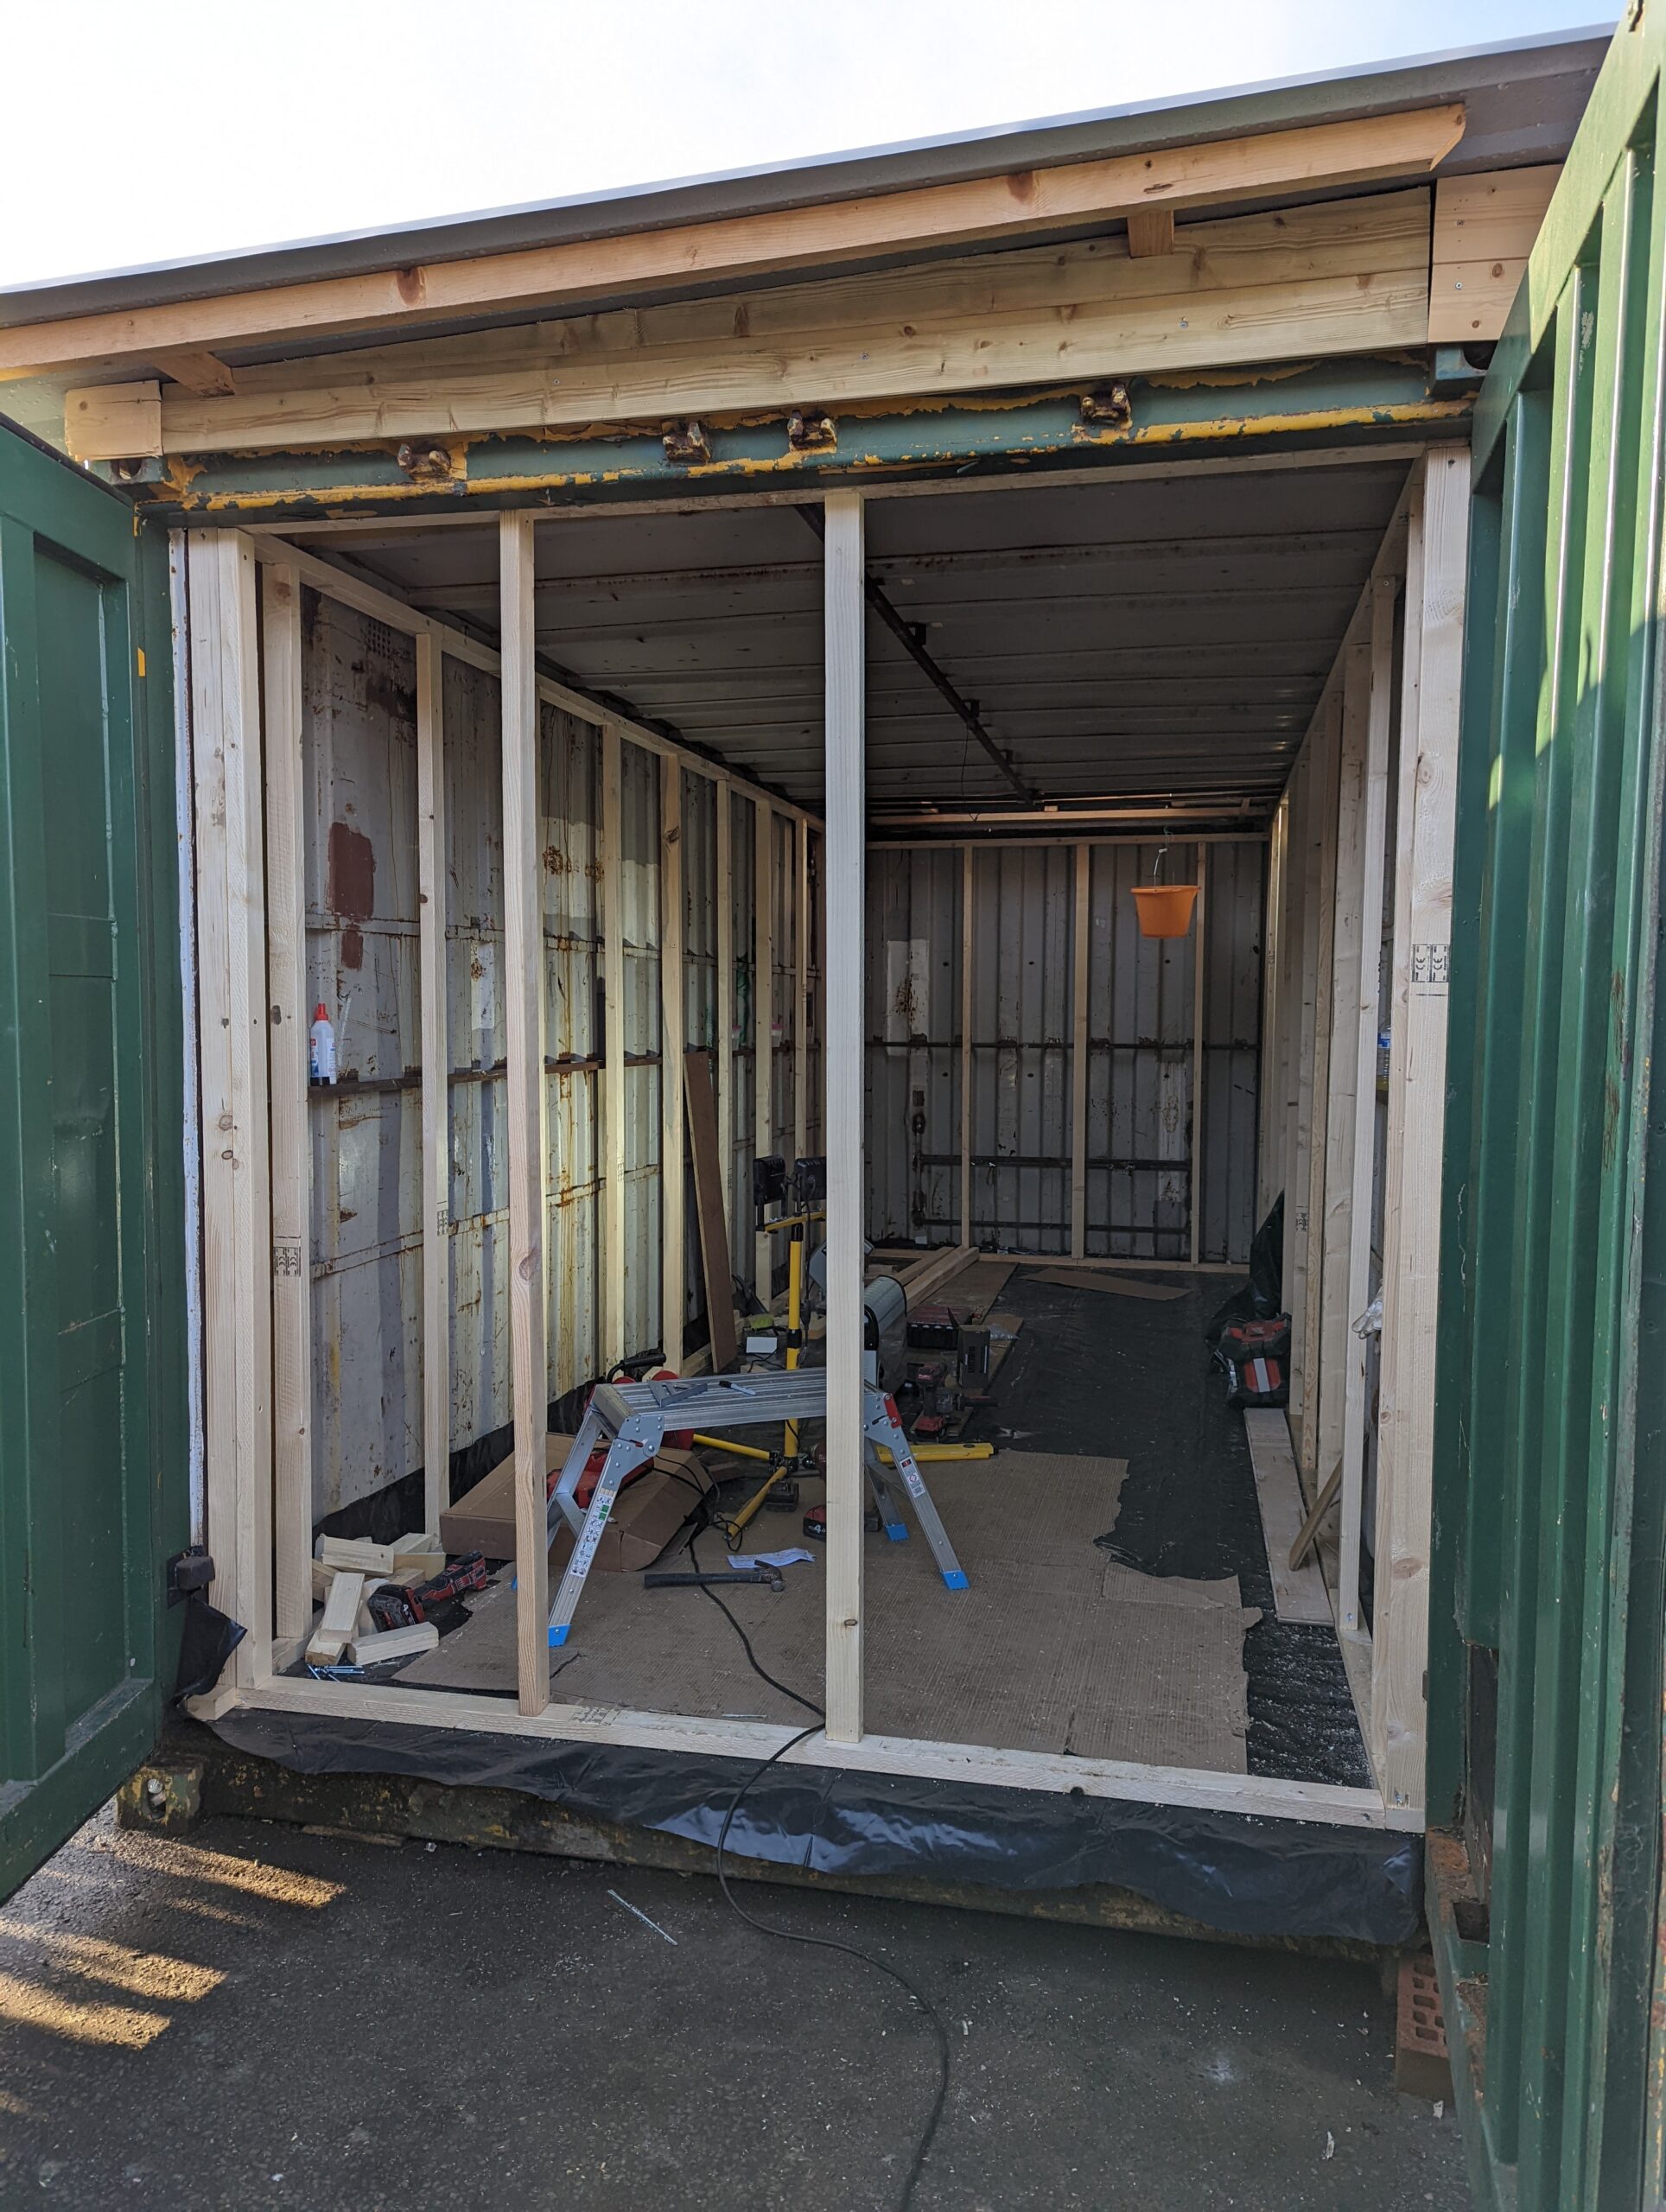
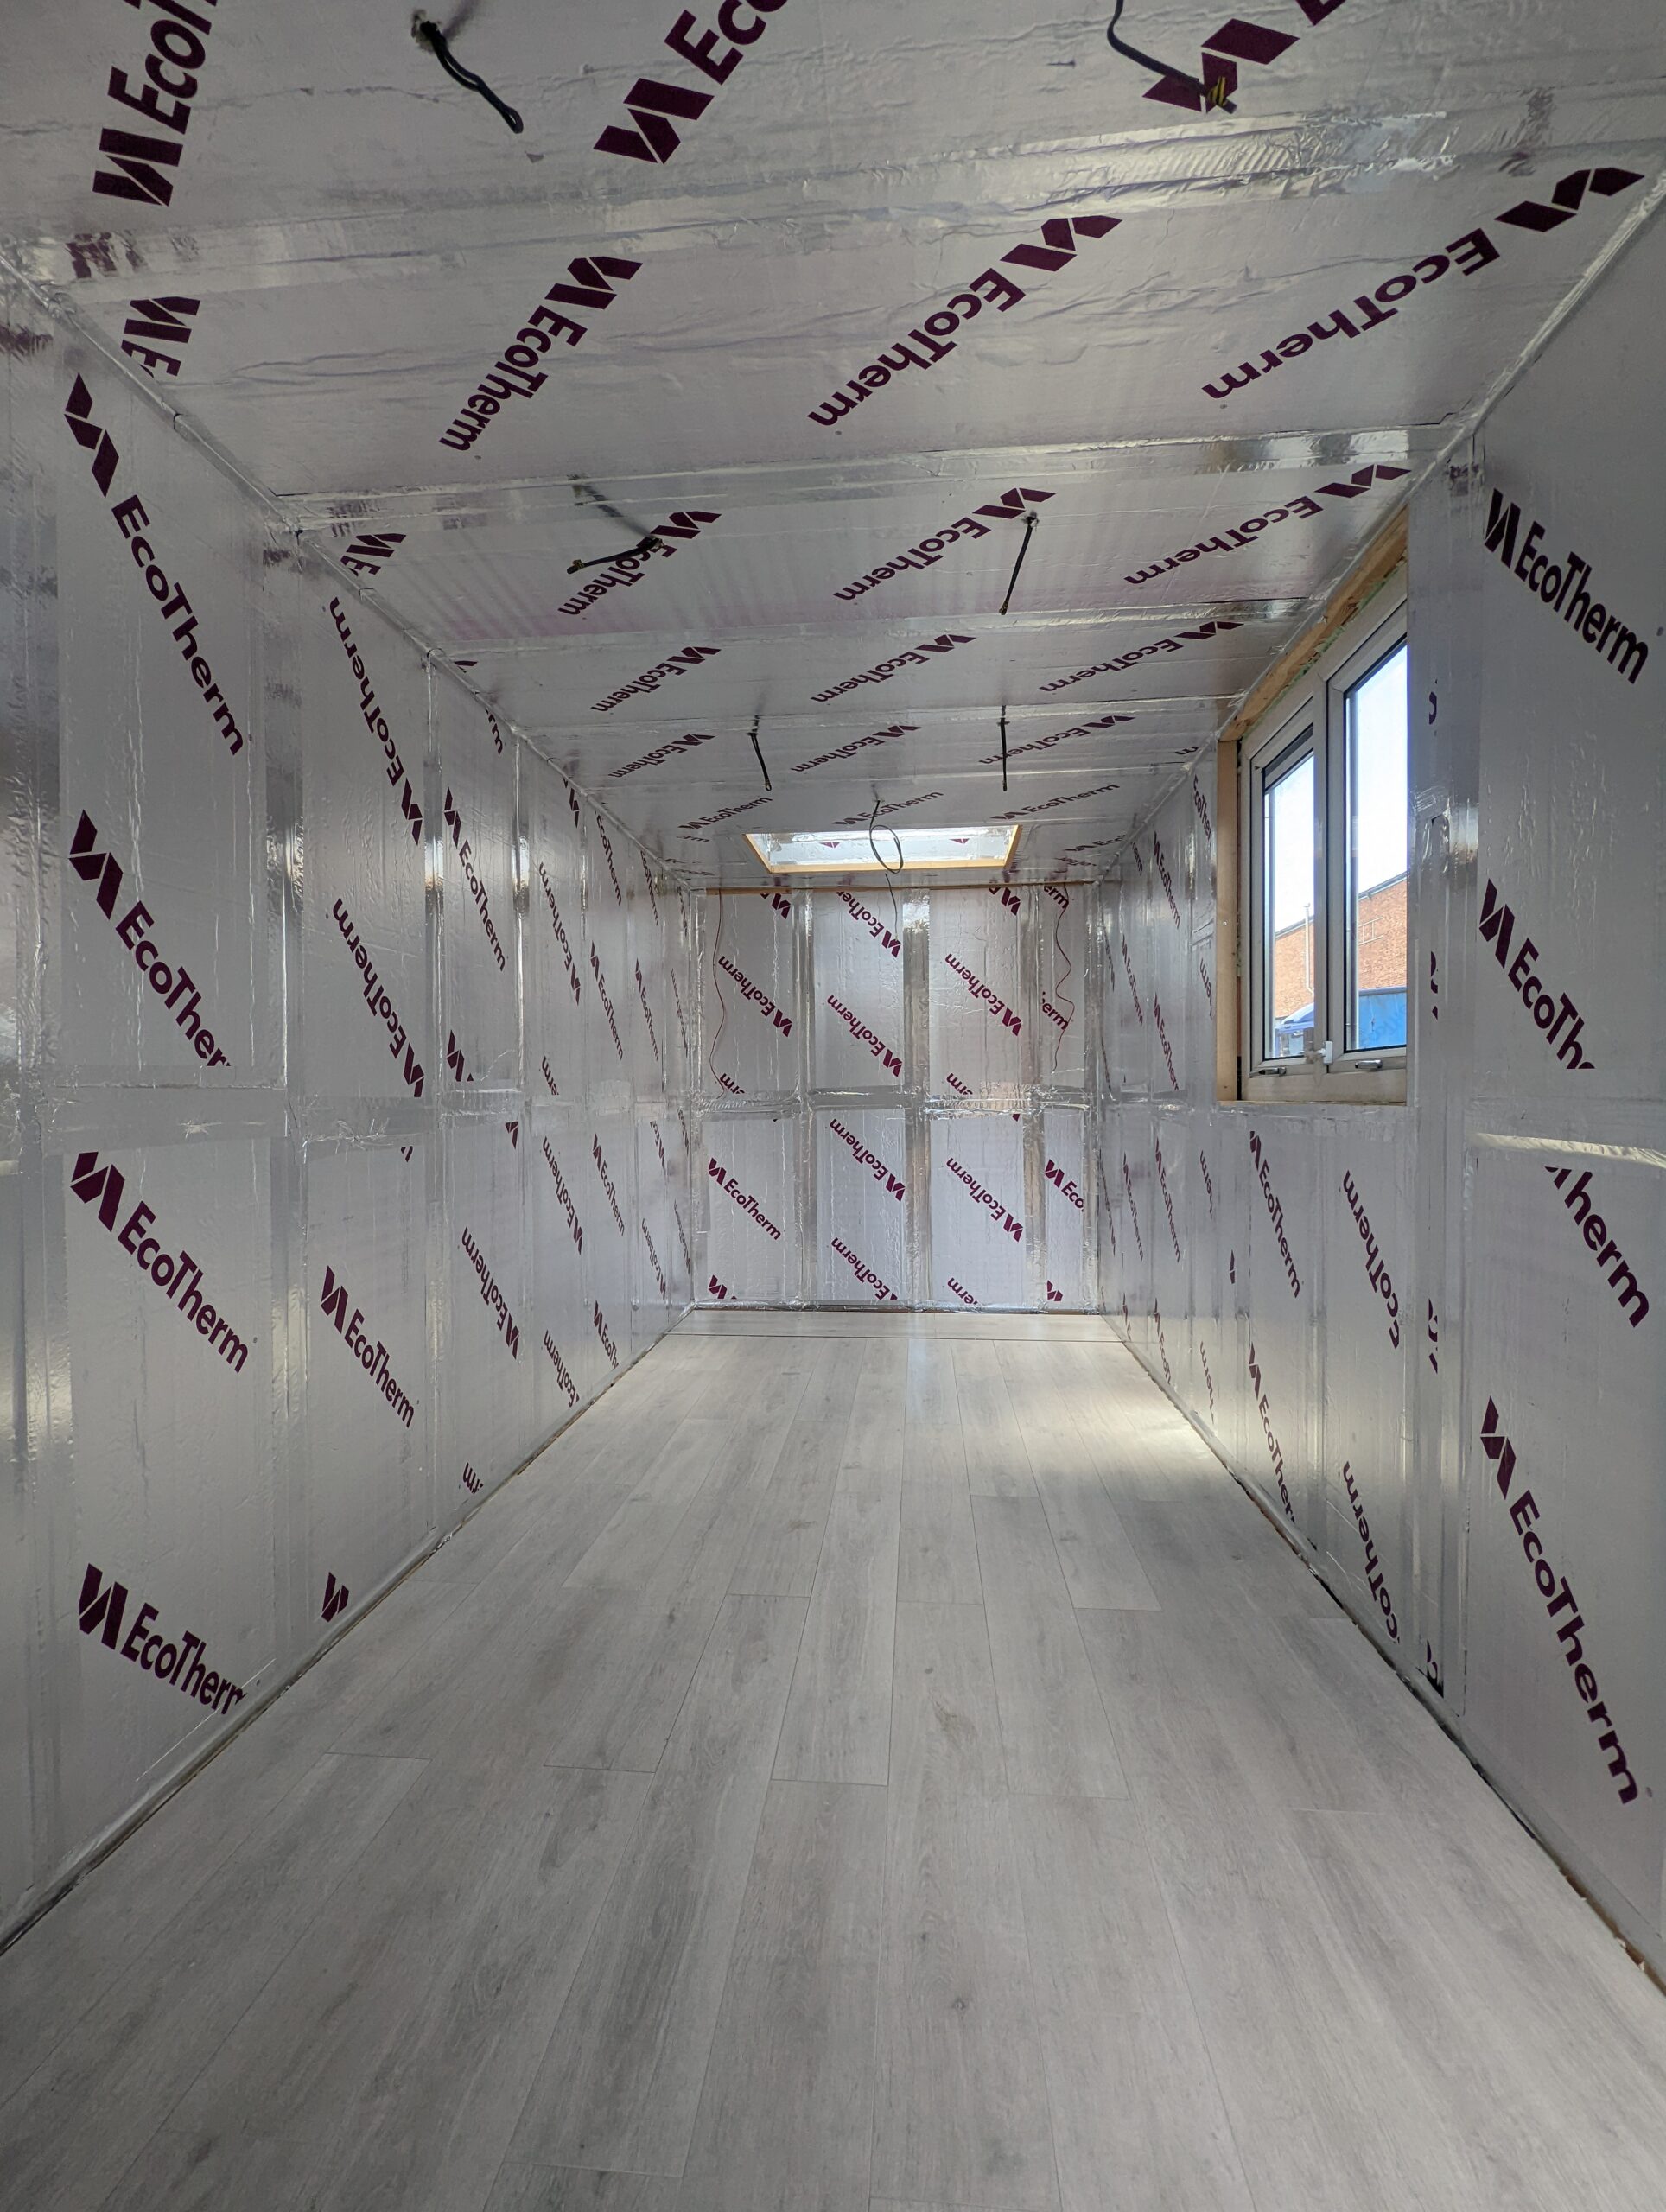
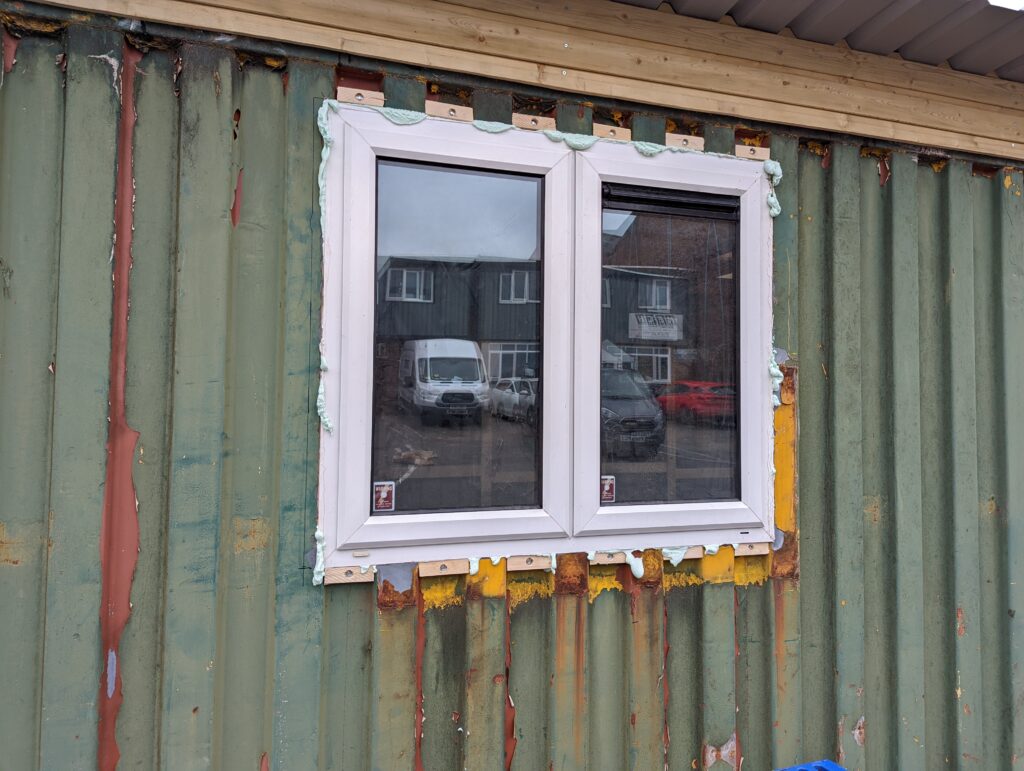
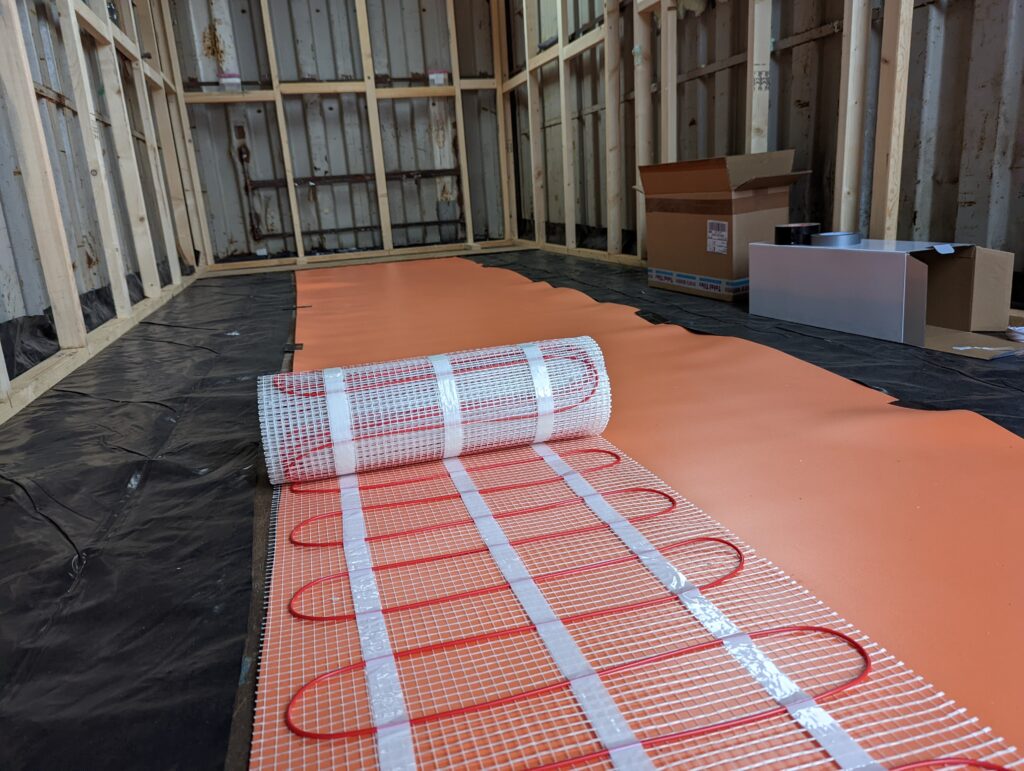
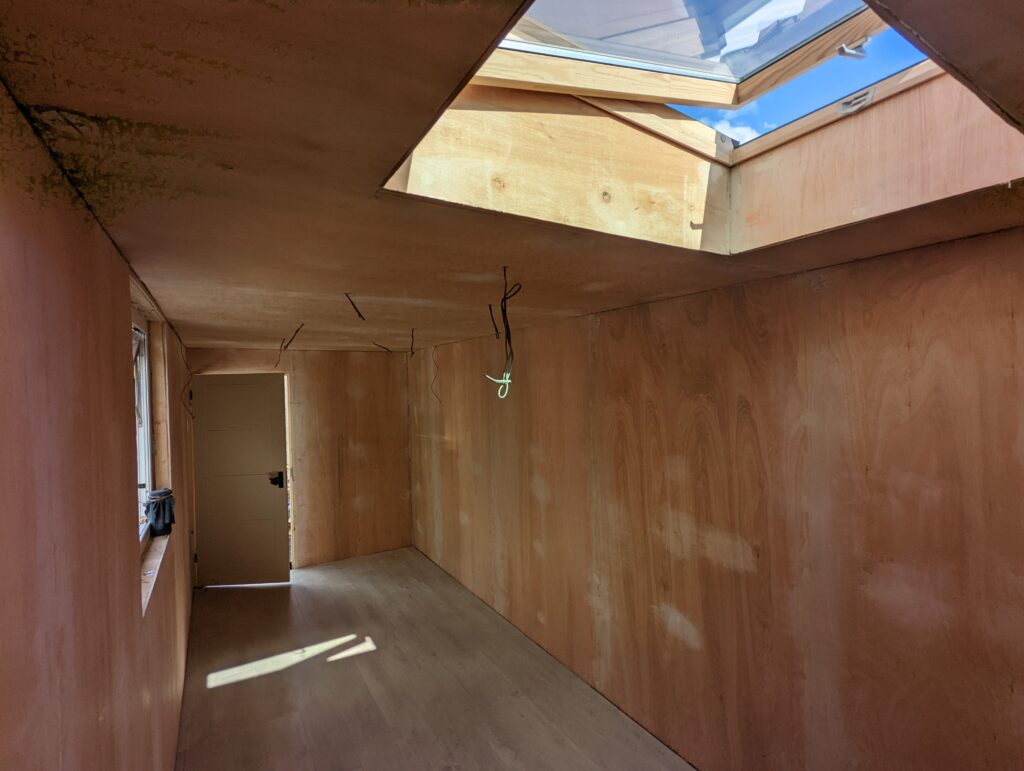
The heaters had dried out the inside of the unit, so I was able to sweep and clean the floor in order to lay down the DPM. Having placed this membrane down, I could then start the stud work. The studs were placed with a 40cm gap and noggins alternating in the middle and both the window and door frames were in place. On completion of the stud work, the next step was to install the side window. This required cutting out a large amount of steel to make room for it. Additionally, I had to create an external frame to which I could attach the window trims; this was made out of timber which was placed in each valley of the external side. Having filled the gaps with expanding foam, I moved on to laying the underfloor heating mats and underlay. Initially, the first laminate flooring was not laid on the entirety of the space. This was because I anticipated building a desk at the end of the room, however, I changed this design as it was taking up too much of space and the new owners might not want the desk in this location. At a later construction point, I took this flooring up and placed new laminate boards that were laid across the entire room. On completion of the laminate flooring, I was able to get the electrical installation underway. Due to my experiences with electrical installations; this was done within half a day. The next step was insulating the container. I had insulation delivered to the site which was promptly implemented. It was key that there were no gaps between the insulation boards and stud work; so any holes were filled with expanding foam and foil tape was used to cover the joints. Additionally, the external container doors were insulated to further improve the thermal properties which are essential in the colder months.
Now that the container was fully insulated, I began plying the ceiling. This was a difficult task to embark on my own, but with the help of a lifting aid, this was done with ease. Photographic evidence of the cabling in the position of the larder unit was taken to enable me to identify the cables upon the second electrical fix. Starting from the back of the container, I used plywood for the walls and around the windows. Having fastened all of the ply sheets through the timber frames, I was able to fill the gaps and screw heads with the appropriate wood filler and sanding techniques. I had a local carpenter friend come to the site to install the frame and door.
Stage Four: Painting and Second Fix
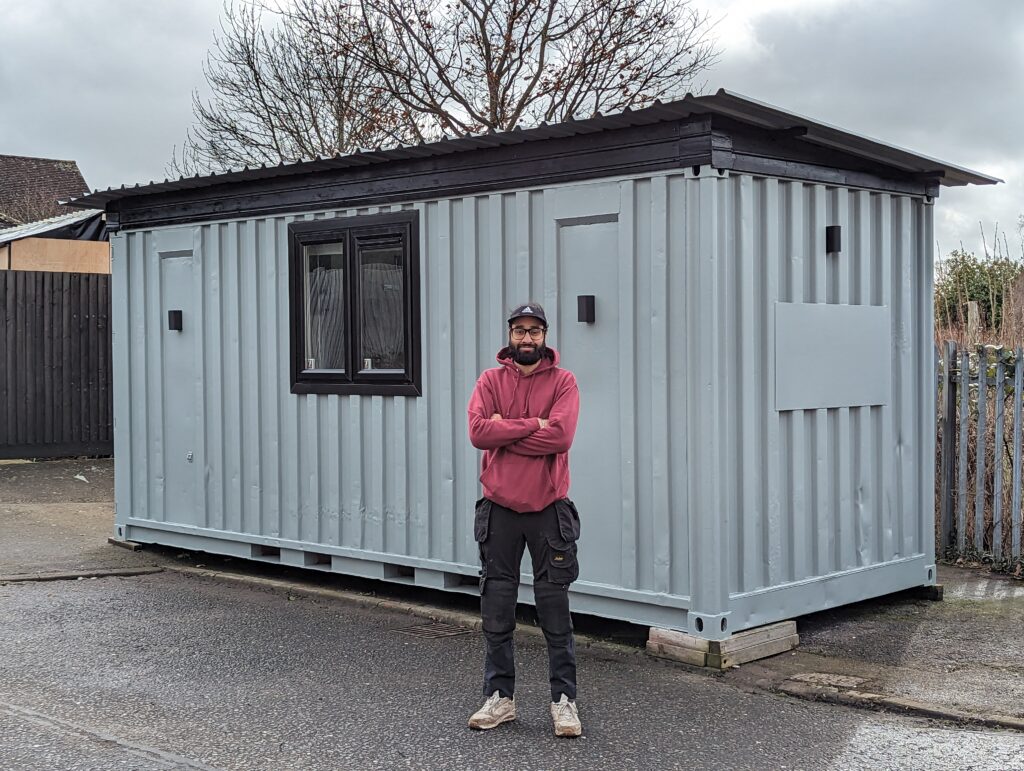
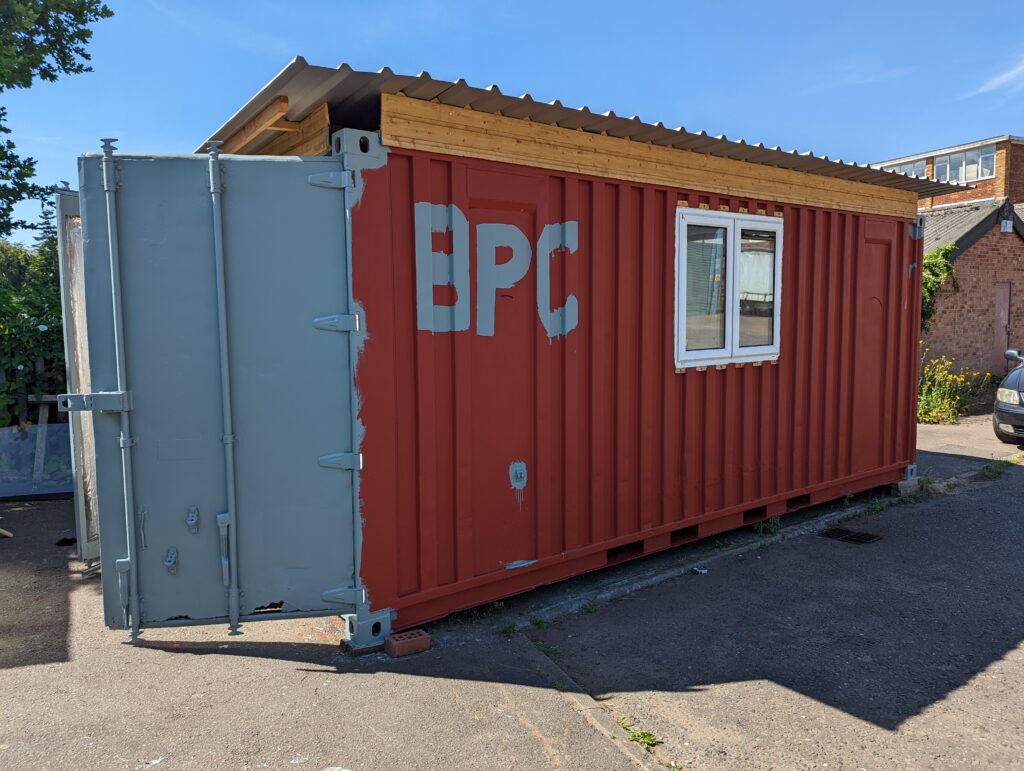
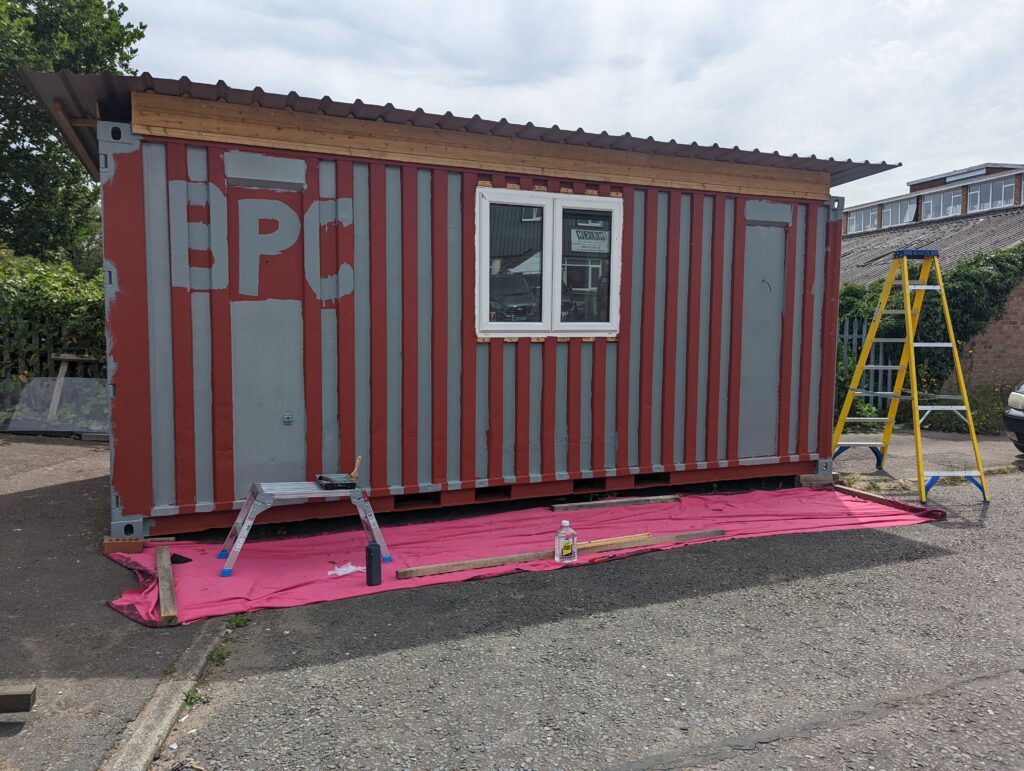
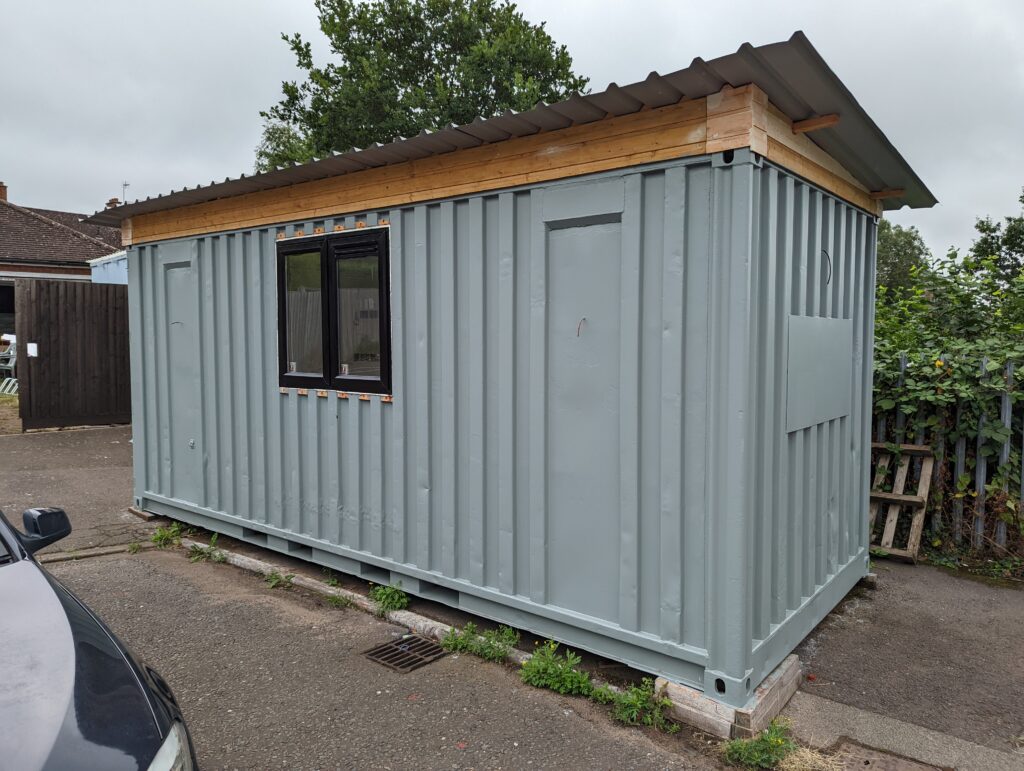
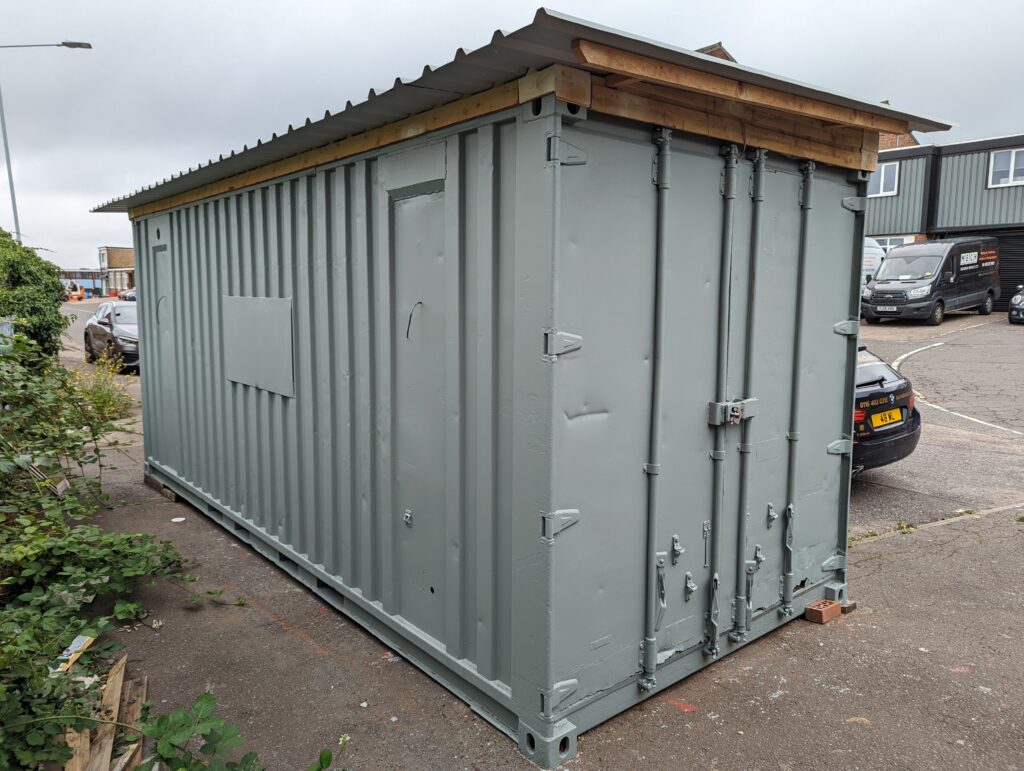
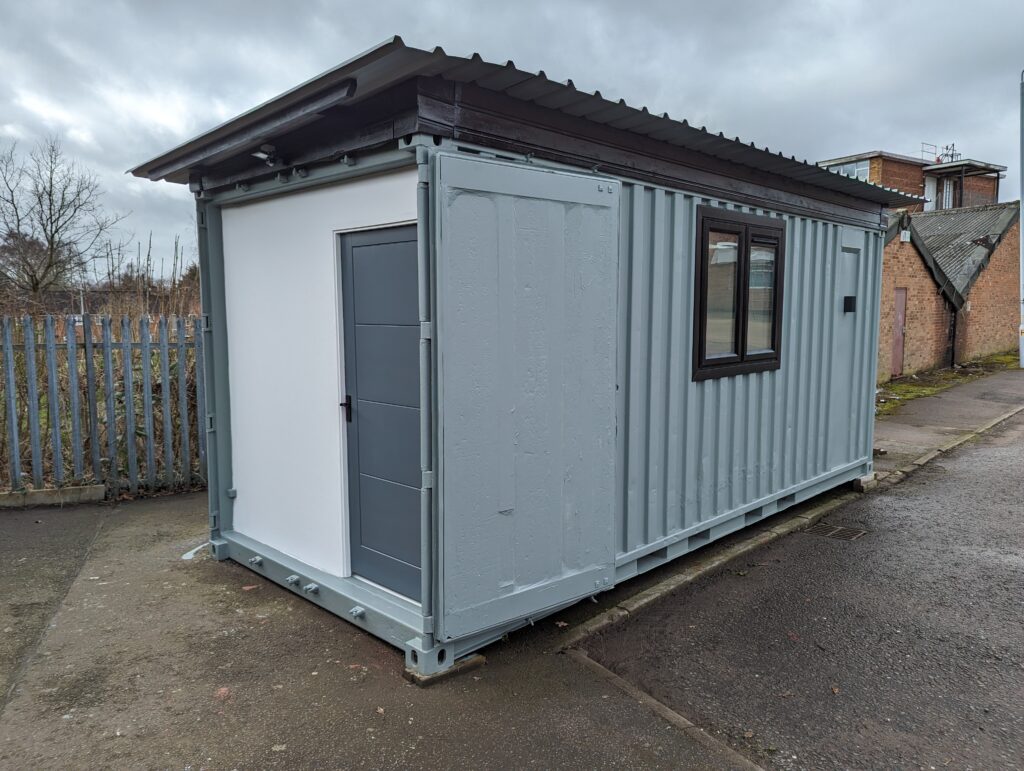
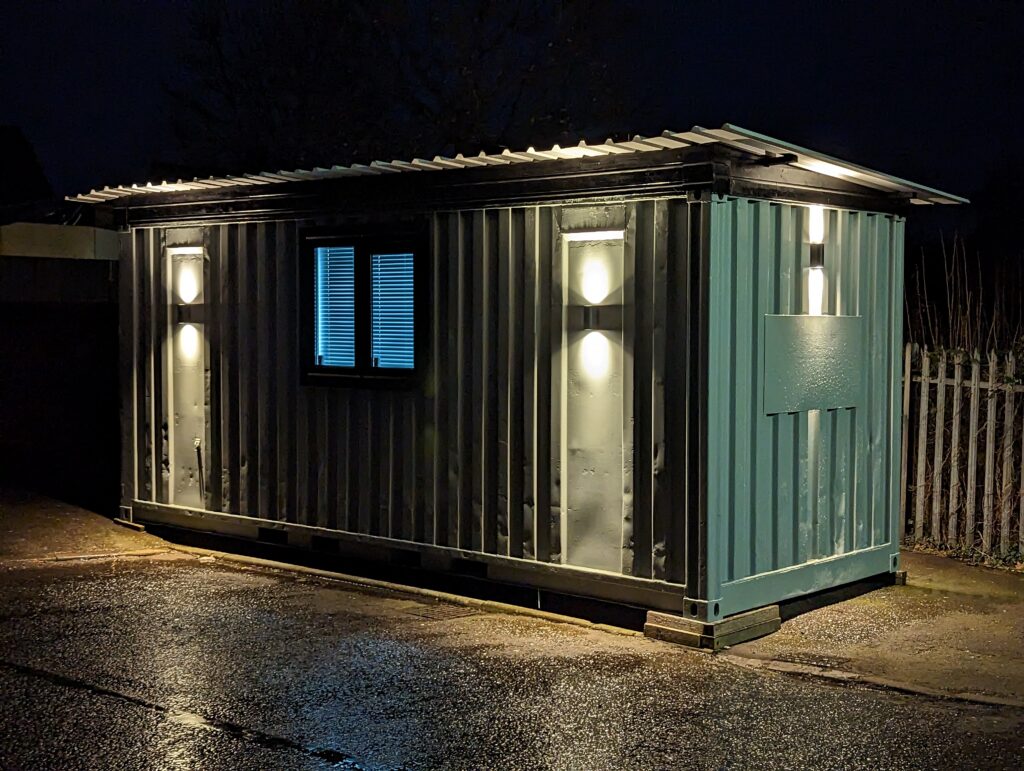
I started to test and prep the outside of the container for priming and painting. Due to the last summer’s heatwave, I thought it was appropriate to get the outside prepped and painted first due to the dryer weather we were having. This was an extremely labour-intensive task and required a lot of attention to detail due to the used condition and various defects on the container’s exterior. I used body filler to fill in the larger dents on the front side of the container; these were then sanded and moulded into the existing shape that the container displays (hills and valleys). Having sanded and treated the entire unit for rust, I was finally ready to paint the first rust protective layer. The red/brown paint shown in the photographs is an industrial level of paint used to protect materials such as industrial RSJs and commercial vehicles; this is essential to enhance the lifespan of this unit. Once all sides of the container’s metal were treated, primed and protected; it was ready for the final grey industrial metal paint. This completely transformed the appearance of the container from its former condition to now having a fresh modern look.
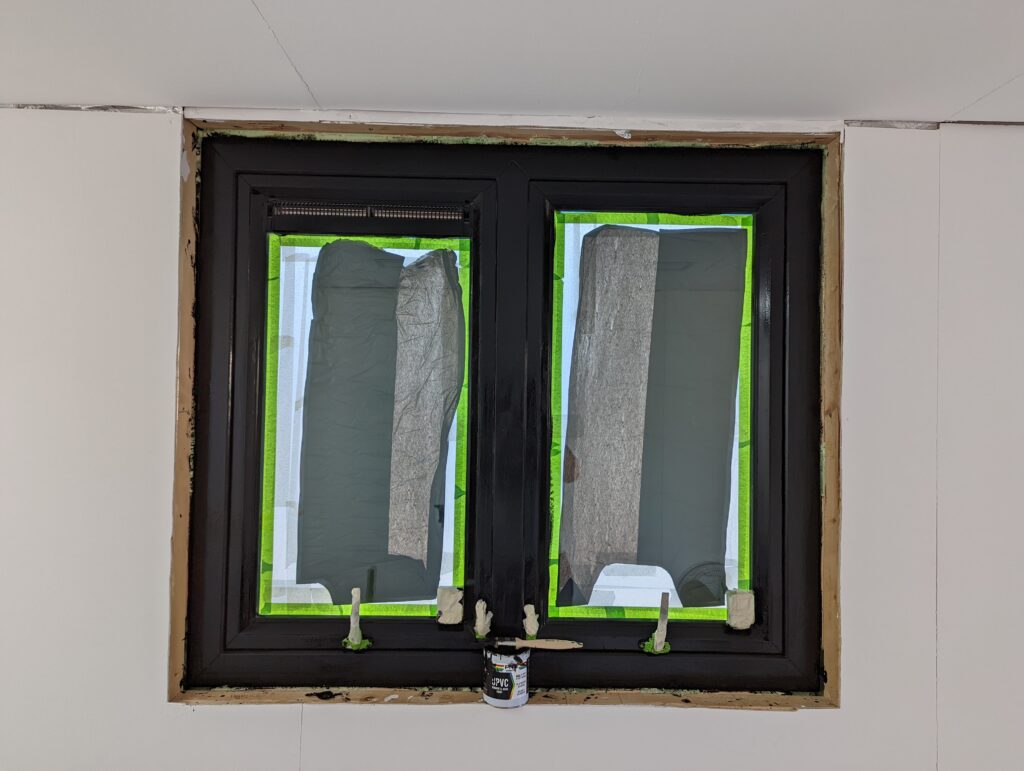
After the outside painting was completed, I moved inside to start the unexpectedly long painting process. This was due to the ply boards absorbing the water-based paint, it took two-three layers before the colour would stay. Between the base layer and the finishing paint, the electrical points were cut out; this allowed for any mistakes to be patched and painted over. After the internal door was painted, I moved on to completing the electrical second-fix. Upon completion, I was able to test all circuits and plugs to ensure that they were working correctly. I then moved on to painting the inside of the window black with specialist UPVC paint. Reflecting on this, I wish I had bought a black window instead as the finish was not up to my standards and was not as I had expected. To complete the window, I sanded and painted the outside part, followed by the matching PVC window trim. The final bit of painting required me to paint the fascia boards and the corner caps were also restructured to enable anyone to easily access the container’s four lifting points. The front door had chequered kick plates installed to complete the external appearance and functionality.

Stage Five: Furnishing and Appliance Installation
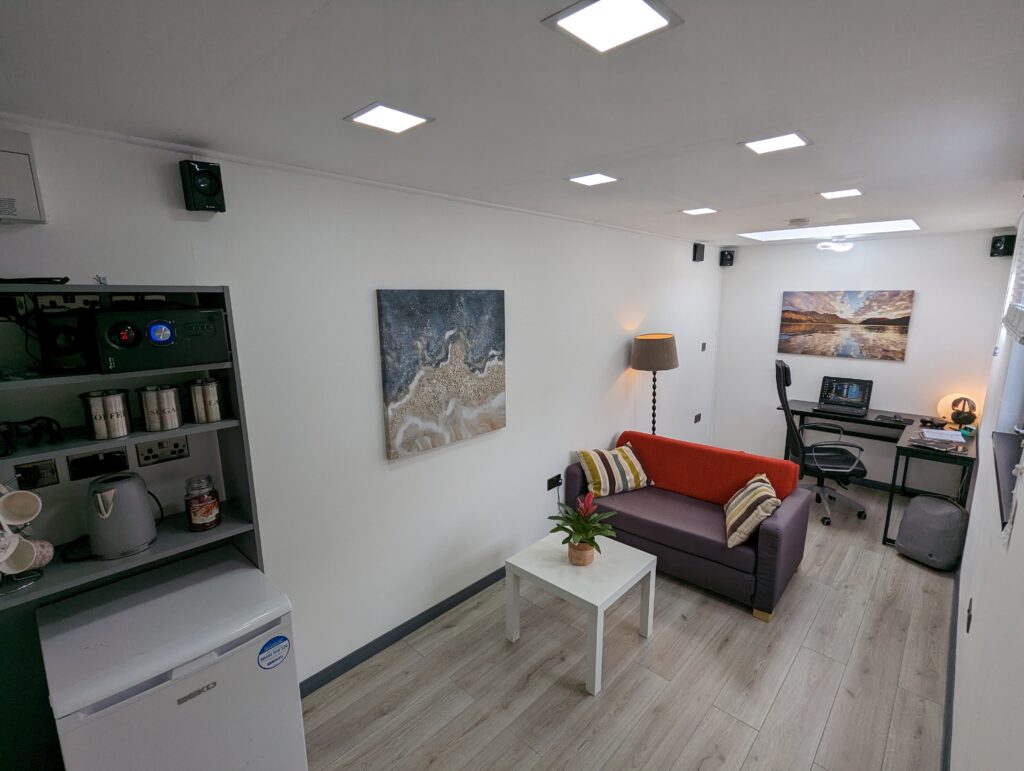
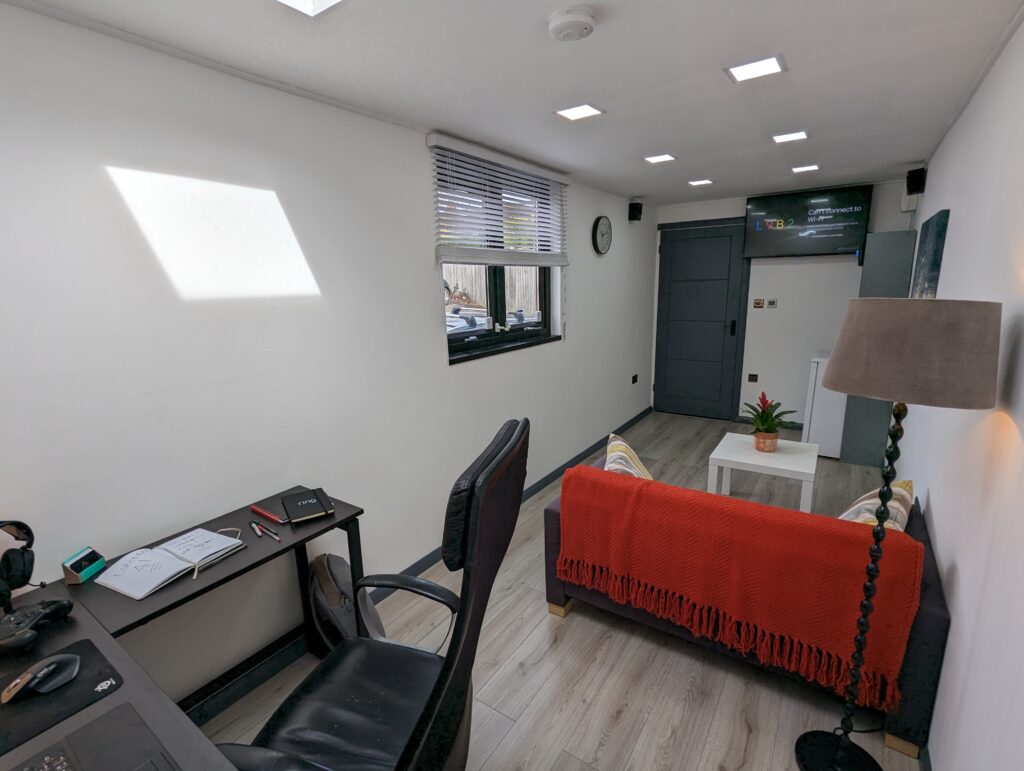
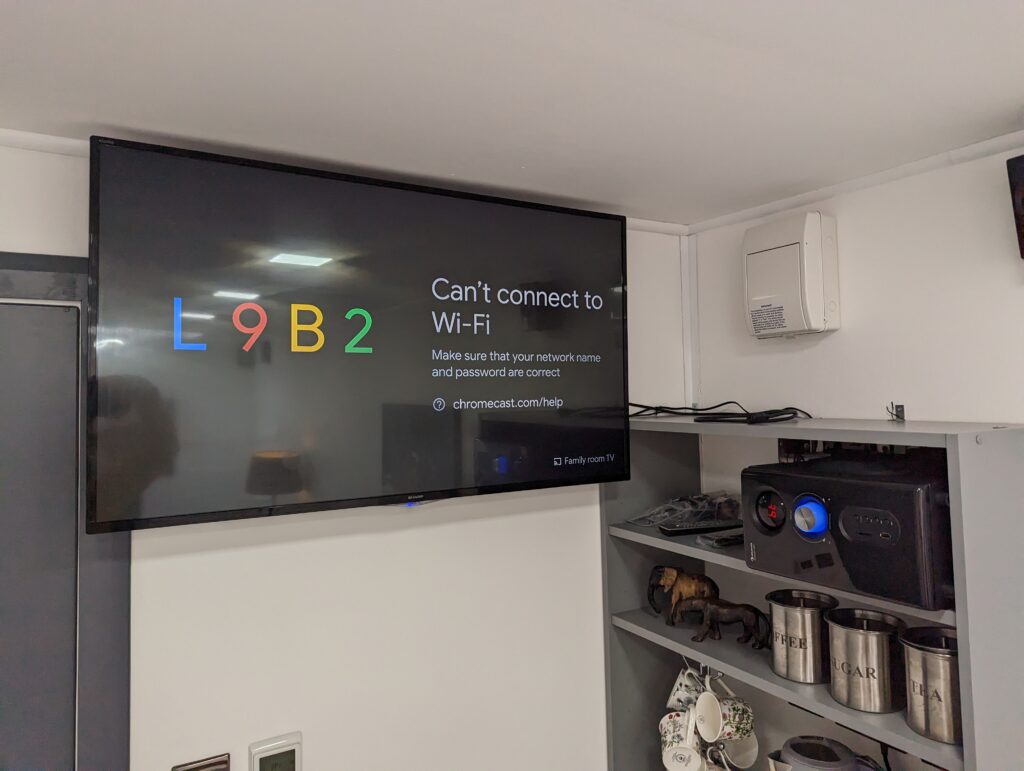
Once the painting was completed, I then moved on to laying the new floor which covered the entire space. I then moved on to fit the shelving unit, skirting boards and door trims. The appliances and blinds were delivered on-site and were promptly installed. This included the TV, surround sound system, refrigerator and the wooden Venetian blinds were also fitted at this point. Finally, I decorated and furnished the container with appropriate multi-purpose furniture. I furnished the unit with a sofa bed, coffee table, desk, work chair, lamp and paintings to give a polished and finished appearance. I believe that this furniture is multi-functional and helps to visualise what the client ends up finishing the space with.
Summary
As the photographs show, this has been a complete renovation from an unusable storage space to become a new, well-equipped living quarter. I am proud to complete an idea that I had thought about doing for many years. It is amazing to see the progress I made and to see the final results in the before and after photographs. On reflection, I would have made a few changes, now being wiser having gone through this process. Some of the things I would keep in mind for future off-site projects include getting assistance from someone equally as interested in the project. This would especially help with some of the labour-intensive tasks that could have been completed quicker with help. In addition, I would have done a few things differently, as mentioned earlier, such as getting the window in the desired colour and perhaps purchasing a better-condition unit to start off with. This is something that I have now learnt from and will implement in future projects. When I undertake the next development, I will look into different materials for wall finishes such as PVC cladding and other flexible materials.
Recommendations
This section is an honest review of the container and any improvements that can be further implemented:
- Since this is a non-permanent structure, each time it is moved, it is very likely that the ply boards will move and cracks in the wall will be induced. An appropriate resolution for this would be to wallpaper the entire container of the buyer’s choice to improve the internal aesthetics.
- Upon delivery to its residing area, the skylight window will need re-sealing as for transportation purposes the end roof sheet will be removed which seats the flashing that makes it water-tight, thus, breaking the seals.
- The first roof sheet that overhangs the large exterior doors, has a slight dip in it. It is most likely that upon movement this could be adjusted to make it more aesthetically pleasing and streamlined, however, all the roofing sheets aren’t 100% uniform so please bare this in mind.
- Thirdly, as mentioned earlier, the UPVC window does not have the nicest of textures and finishes; it is not perfect but probably will not bother most. Again, this may be down to my personal preferences, but to be completely honest I thought it might be worth mentioning.